

I made a backpack! Which checked off an item on my sewing bucket list. I’ve been wanting to make a backpack (or bag) for so long now! In fact, a year or more ago, I went and picked up all the supplies I needed to make one buuuuut then I never got around to it. However, being pregnant and having a desire to sew but very little desire to sew clothing is a great motivator to make yourself a backpack once and for all! Just to add to the motivational factors I also had a trip to Boston coming up AND I knew that if I chose carefully, whatever pattern I made could double as a diaper bag. I don’t NEED a new diaper bag…I have one that is fully functional and has only seen the likes of 2 babies. But sometimes a change is nice, especially after you’ve had some experience and better know what you want.
ANYWAY. This was my first bag making experience and I have a lot to say on the topic, so let’s dive in.
Deciding on a Pattern
First was deciding on a pattern, which, let me tell you, took a billion years, or something of the sort. I had a very difficult time choosing which pattern to sew. I think a big part of it is just the fact that bag making is so very new to me, so I have no clue what to look for when choosing a pattern. Another difficult thing is that people who sew clothes seems to also love blogging about said clothes but people who sew bags don’t seem to love blogging about their bags, or maybe that’s just a niche I’ve yet to discover on the world wide web. So it was hard for me to find information about any of the patterns I looked into.
The one exception to this would probably be the bags from Klum House. Blog posts on these patterns abound BUT never singularly the pattern because they also do kits and it seems like that is the most popular way to go if choosing to work with them. For quite awhile I was sure I was going to purchase a kit/pattern from them. I mean, if you’ve ever checked their bags out, you’ll know that the temptation is strong. Their bags are drool worthy and I’ve only ever heard wonderful things about their products, patterns, and tutorials. I decided not to go with them partly because I really wanted to have side pockets for a water bottle and none of their designs deliver that (I also don’t know bag making well enough to alter a pattern to include that). But mostly I chose not to because of the price. I’ve no doubt their materials are high quality and gorgeous but the kit I wanted was close to $200 and I have a hard time spending $200 on anything, let alone something I’ll have to construct myself. So this time Klum House wasn’t in the cards for me but maybe in the future I’ll feel just reckless enough (and probably more accurately just got-my-crap-together-because-I’m-an-adult enough) to get one of their kits. Maybe.
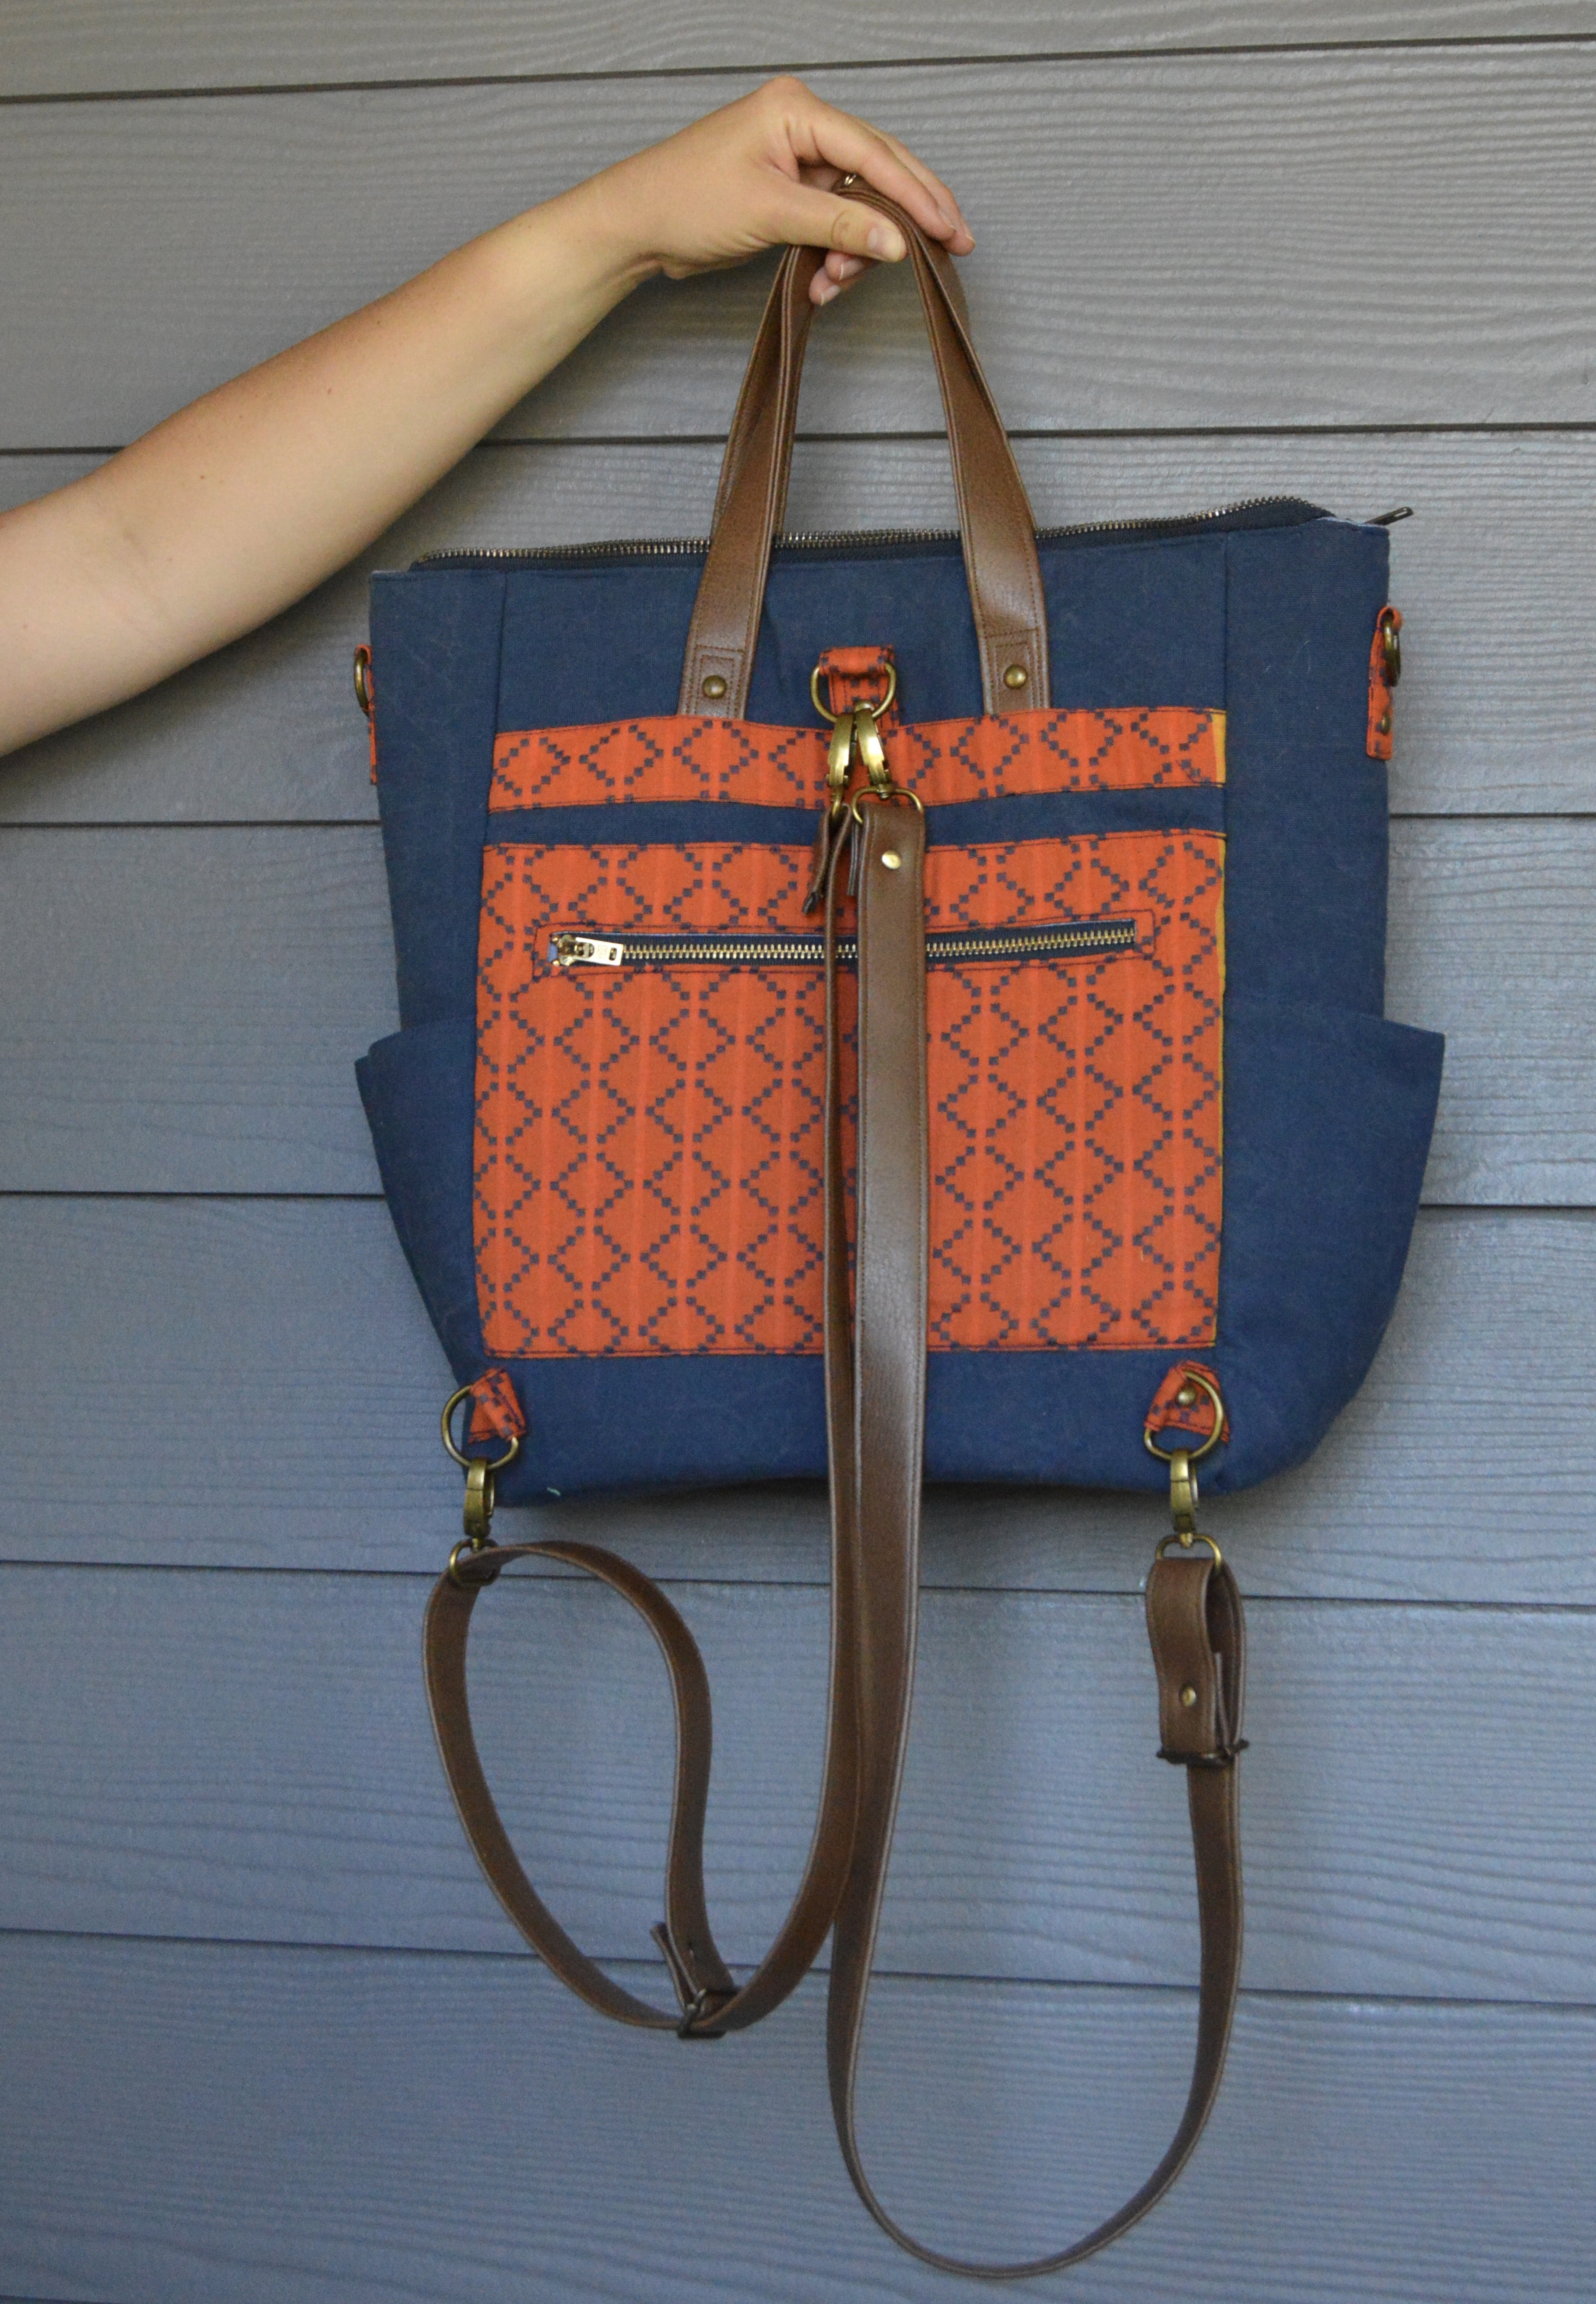
I only know of a couple designers who specifically do bag designs, so the best place for me to look was Etsy. They have a good selection of bag/backpack patterns and it’s nice that you can check out reviews right on the website. That’s where I first stumbled onto the Trailblazer Backpack from Bagstock Designs. The design is very cute and functional and the pattern had good reviews, with a fair number of customer-posted photos (that also look very cute). It also had the side pockets I wanted and the price was very reasonable ($7.95 on Etsy; $6.95 on the Bagstock Designs website).
Sourcing Material
Once I decided this was the bag for me, I started researching where to get all the supplies. I think one of the very most daunting things about bag making is just the sheer number of supplies that are needed for the project. Most of the clothes I make, I have to make sure I have fabric and maybe 1 or 2 notions that I don’t already have in my stash. But for bags, you often need a couple fabrics plus several different interfacings/stabilizers as well as a handful of different types of hardware (most of which I’ve never used/installed before). It can get a little bit crazy trying to source all these materials in a relatively fast and economical way.
So first I looked to see if there was a hardware kit available. There is, but it doesn’t include zippers and it does include the bag feet (which I didn’t want) so I didn’t think it was necessarily the best choice for me. So then I pulled up a couple of different shops on Etsy as well as Wawak and started tracking and comparing which shop had what and for what price so I could see which had the most items and the best prices. Wawak won by a landslide. Not only did it stock all the hardware/zippers I needed, it also had the best prices, like, by a lot. So I bought all the needed hardware and zippers from Wawak. I bought all my interfacing at either Joann or Hobby Lobby.
As for fabric, I was having a hard time decided what I wanted on the exterior. I don’t even quite know how to explain it other than there are things I like and things I don’t like and also I don’t want to get sick of it quickly! But then I had the idea to copycat the Klum House bag that I’d had my eye on. Their version used one of the Ruby Star Society warp and weft fabrics along with a waxed canvas. I think it’s a lovely combo, so I decided to go for it. Awhile ago I noticed that Hobby Lobby carries a washed canvas that has the same worn look as waxed canvas (but it’s not waxed; it’s washed) and that’s what I wanted to get. It is more accessible to me than waxed canvas, would be easier to sew, and will require much less upkeep. I knew I wouldn’t be able to find the Ruby Star fabric locally, so to avoid having to pay for shipping, I asked my mom to pick some up for me from Harmony Provo (after calling to make sure they had it, of course) and she gave it to me the last time we saw each other. I used a chambray for the lining and a vinyl for the straps and handles (both from Hobby Lobby).

Construction
So first I should say this was my very first foray into bag making and, as you can see from the photos, the pattern and following the instructions resulted in a bag. So that’s something to consider. But putting the bag together was quite a process and didn’t come without a decent amount of reading and rereading instructions and, yes, I admit, a fair amount of cursing.
There are about 18 different pattern pieces. Almost all of the pattern pieces are squares or rectangles, so you could easily just measure these pieces, but I chose to print out my pattern pieces. However, there were 2 pattern pieces that didn’t print (I think because they’re not on the file). Luckily I was paying attention to the sheet that specified all the pieces you’d need so I saw they were missing and was able to cut them out using their dimensions anyway.
Cutting out the pattern pieces was a bit crazy and definitely time consuming because most of the pattern pieces are meant to be cut out in three different materials (for example: cut two each of exterior, lining, and interfacing). It took me an entire evening plus some of another evening (but only because I cut my canvas when I should have been cutting my warp and weft so I had to abort ship until I could go to Hobby Lobby the next day to get more canvas. Womp womp.). But the pattern pieces are all very clear about which materials to cut with each piece. It’s just a bit of an organizational conundrum.
So I actually cut all my fabric at my place and then we went to visit my parents and since my mom’s sewing room is less “room” and more “mecca” I thought it’d be better to sew the bag at her place using all her fancy equipment. The first thing the instructions tell you to do is adhere some of the interfacings. For some reason it doesn’t tell you to do it all, but by golly, I did it all which helped my sanity by drastically cutting down the number of pieces I was working with.
The remaining instructions all seemed very clear and easy to follow, although I did make a handful of mistakes (many for which I only have myself to blame). One (self made) issue I had came from trying to omit the flap that’s on the front. For some reason, simply omitting it was a huge mind boggler for me and so the front of my bag has some very noticeable issues with it. Now, having completed the bag, if I were to make the bag again and also omit the flap, I would just copy the back pocket for the front and I think it’d go a lot smoother.
Inserting the hardware was surprisingly easy. I was really nervous about that part of the the bag making process but it really didn’t give me many issues. The most difficult for me were the rivets.
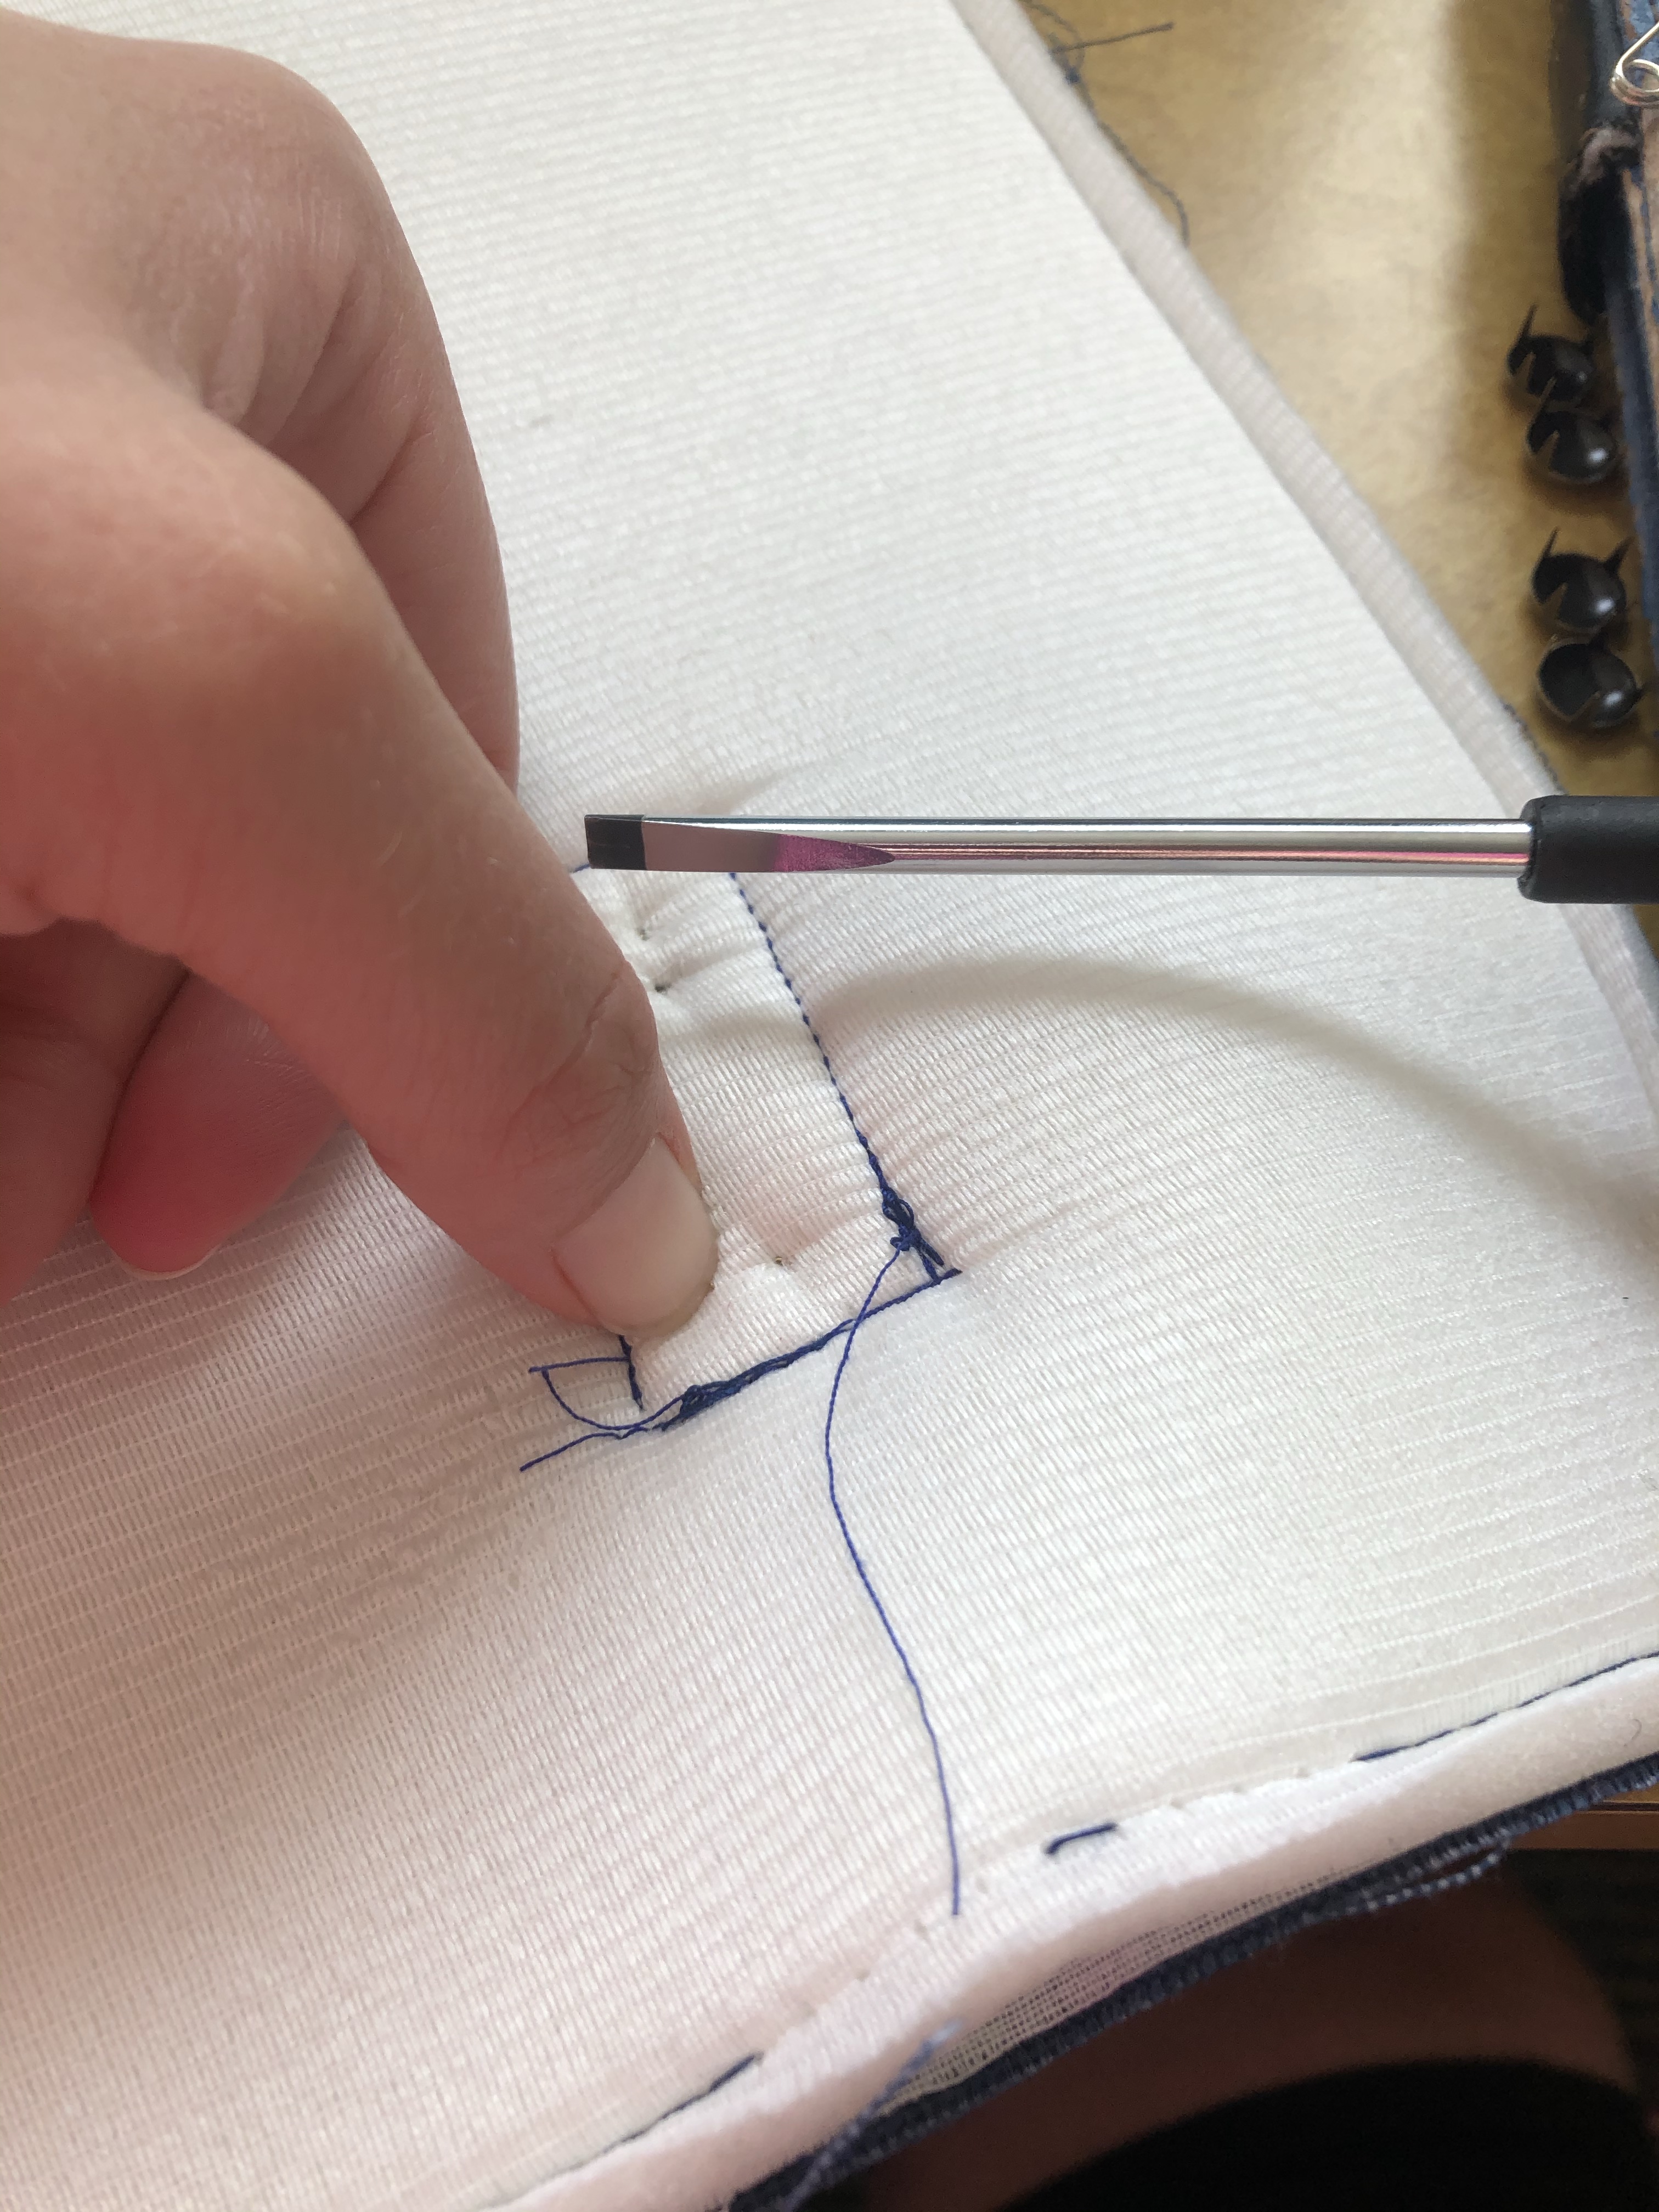
Rivets and I don’t have the best history. I installed some on my Ginger jeans and all but one of them popped off within the first couple of wears (so I just took out the last one so it wasn’t so lonely). So for this project I chose prong rivets thinking they’d be much easier to install. They were, to an extent, except that I was trying to install them through layers of fabric and interfacing AND foam. I really had to root around that foam to find each prong and then I used a flat head screwdriver to push down each prong. Those teeny dots by my thumb are said prongs.
When I got to the straps, the prong rivets were not nearly long enough to pierce through 8 (!!!) layers of vinyl. I tried sewing those 8 layers of vinyl but no machine I tried could handle that very well. So I eventually went out and bought some actual rivets. Now I was on a timeline, so I just went to Joann’s a bought what they had in stock that matched the antique brass of all the other hardware on the bag. The posts weren’t very long and unfortunately, one strap already broke, darn it. But I noticed that you can buy leather rivets that have significantly longer posts and that would probably be a better thing to have bought, not just for the straps, but for the entire bag. I mean the whole reason behind adding a rivet is to ensure that the fabric can withstand the weight of whatever you put in the bag, so a worthwhile investment, in my opinion. Now I know.
Aside from the rivet fiasco, I also broke about 5 needles in the sewing process. And, I’ll be honest, I’ve broken a couple handful of needles in my life and it’s always been clear why the needle broke (usually it’s because I shamefully forgot to remove a pin). But for every sing breakage on this project, I was never totally sure why the needle broke. I’m assuming it was just the sheer number of layers and also maybe I ran into the stiff stabilizer? I don’t know for sure, but gosh, did those needles see some stuff. Sorry, needles! And yes, I was using jeans needles the whole time!
OthERwiSE, the process was pretty smooth and straightforward. I can’t compare since I’ve never made anything like this, but I think the pattern and instructions were pretty good.
Cost
So a person like myself might be wondering if making a backpack like this is cost effective and I would say my answer is that it depends on how you look at it. You can get a decent backpack/diaper bag for 20 or 30 dollars and be set. Conversely you can also spend several hundred dollars (I know you can spend many, many thousands too, but I think that’s another side of things entirely). I spent $64.15 (ish) on everything I needed for the bag. Aside from the zippers, slides and D rings, I think I have extra of everything (oh, except for the Pellon 101, I used every last bit of that 3 yards, plus some more from my stash). Here’s a breakdown of how much everything cost for me (I bought my Ruby Star exterior fabric from Harmony Provo, my remaining fabric, lining, interfacing and stabilizer from Hobby Lobby. Zippers and hardware from Wawak, except the post rivets which are from Joann).
- 1 yard quilting weight exterior fabric $15 (I actually got this for free, but I’ll include the cost here just for reference)
- 1/2 yard contrasting fabric $6
- 1 1/4 yard lining fabric $6
- 3 yards Pellon 101 shapeflex interfacing $10.50
- 1 1/4 yard sew-in foam interfacing $6.80
- 11.25×5.25″ fusible stiff stabilizer $1.20
- 4×4.5″ decor bond stabilizer (stash)
- 20″ handbag zipper $1.50
- 8″ handbag zipper (I used two of these instead of an 8″ all purpose for the interior pocket) $1.70
- 9″ jean zipper (again, used jean instead of all purpose) $0.70
- (2) 1″ sliders $5
- (5) 1″ D rings $1.50
- (4) 1″ swivel hooks $4.80
- Prong Rivets (pack of 100) $2.50
- Post rivets and rivet setting tool $9 (I can’t actually remember and didn’t keep the receipt so this is give or take a couple dollars)
- Pattern $6.95
That’s 79.15 total so it’s debatable as to whether or not the cost is worth it. It’s cheaper than my first diaper bag and cheaper than the coveted Klum House bag, but I also could very well have spent 20 bucks on Amazon and gotten something just fine. But this project was fun for me and it was cool to be able to pick and choose some of the features I was interested in, like opting for antique brass hardware and being able to use that gorgeous warp and weft.
Overall Thoughts
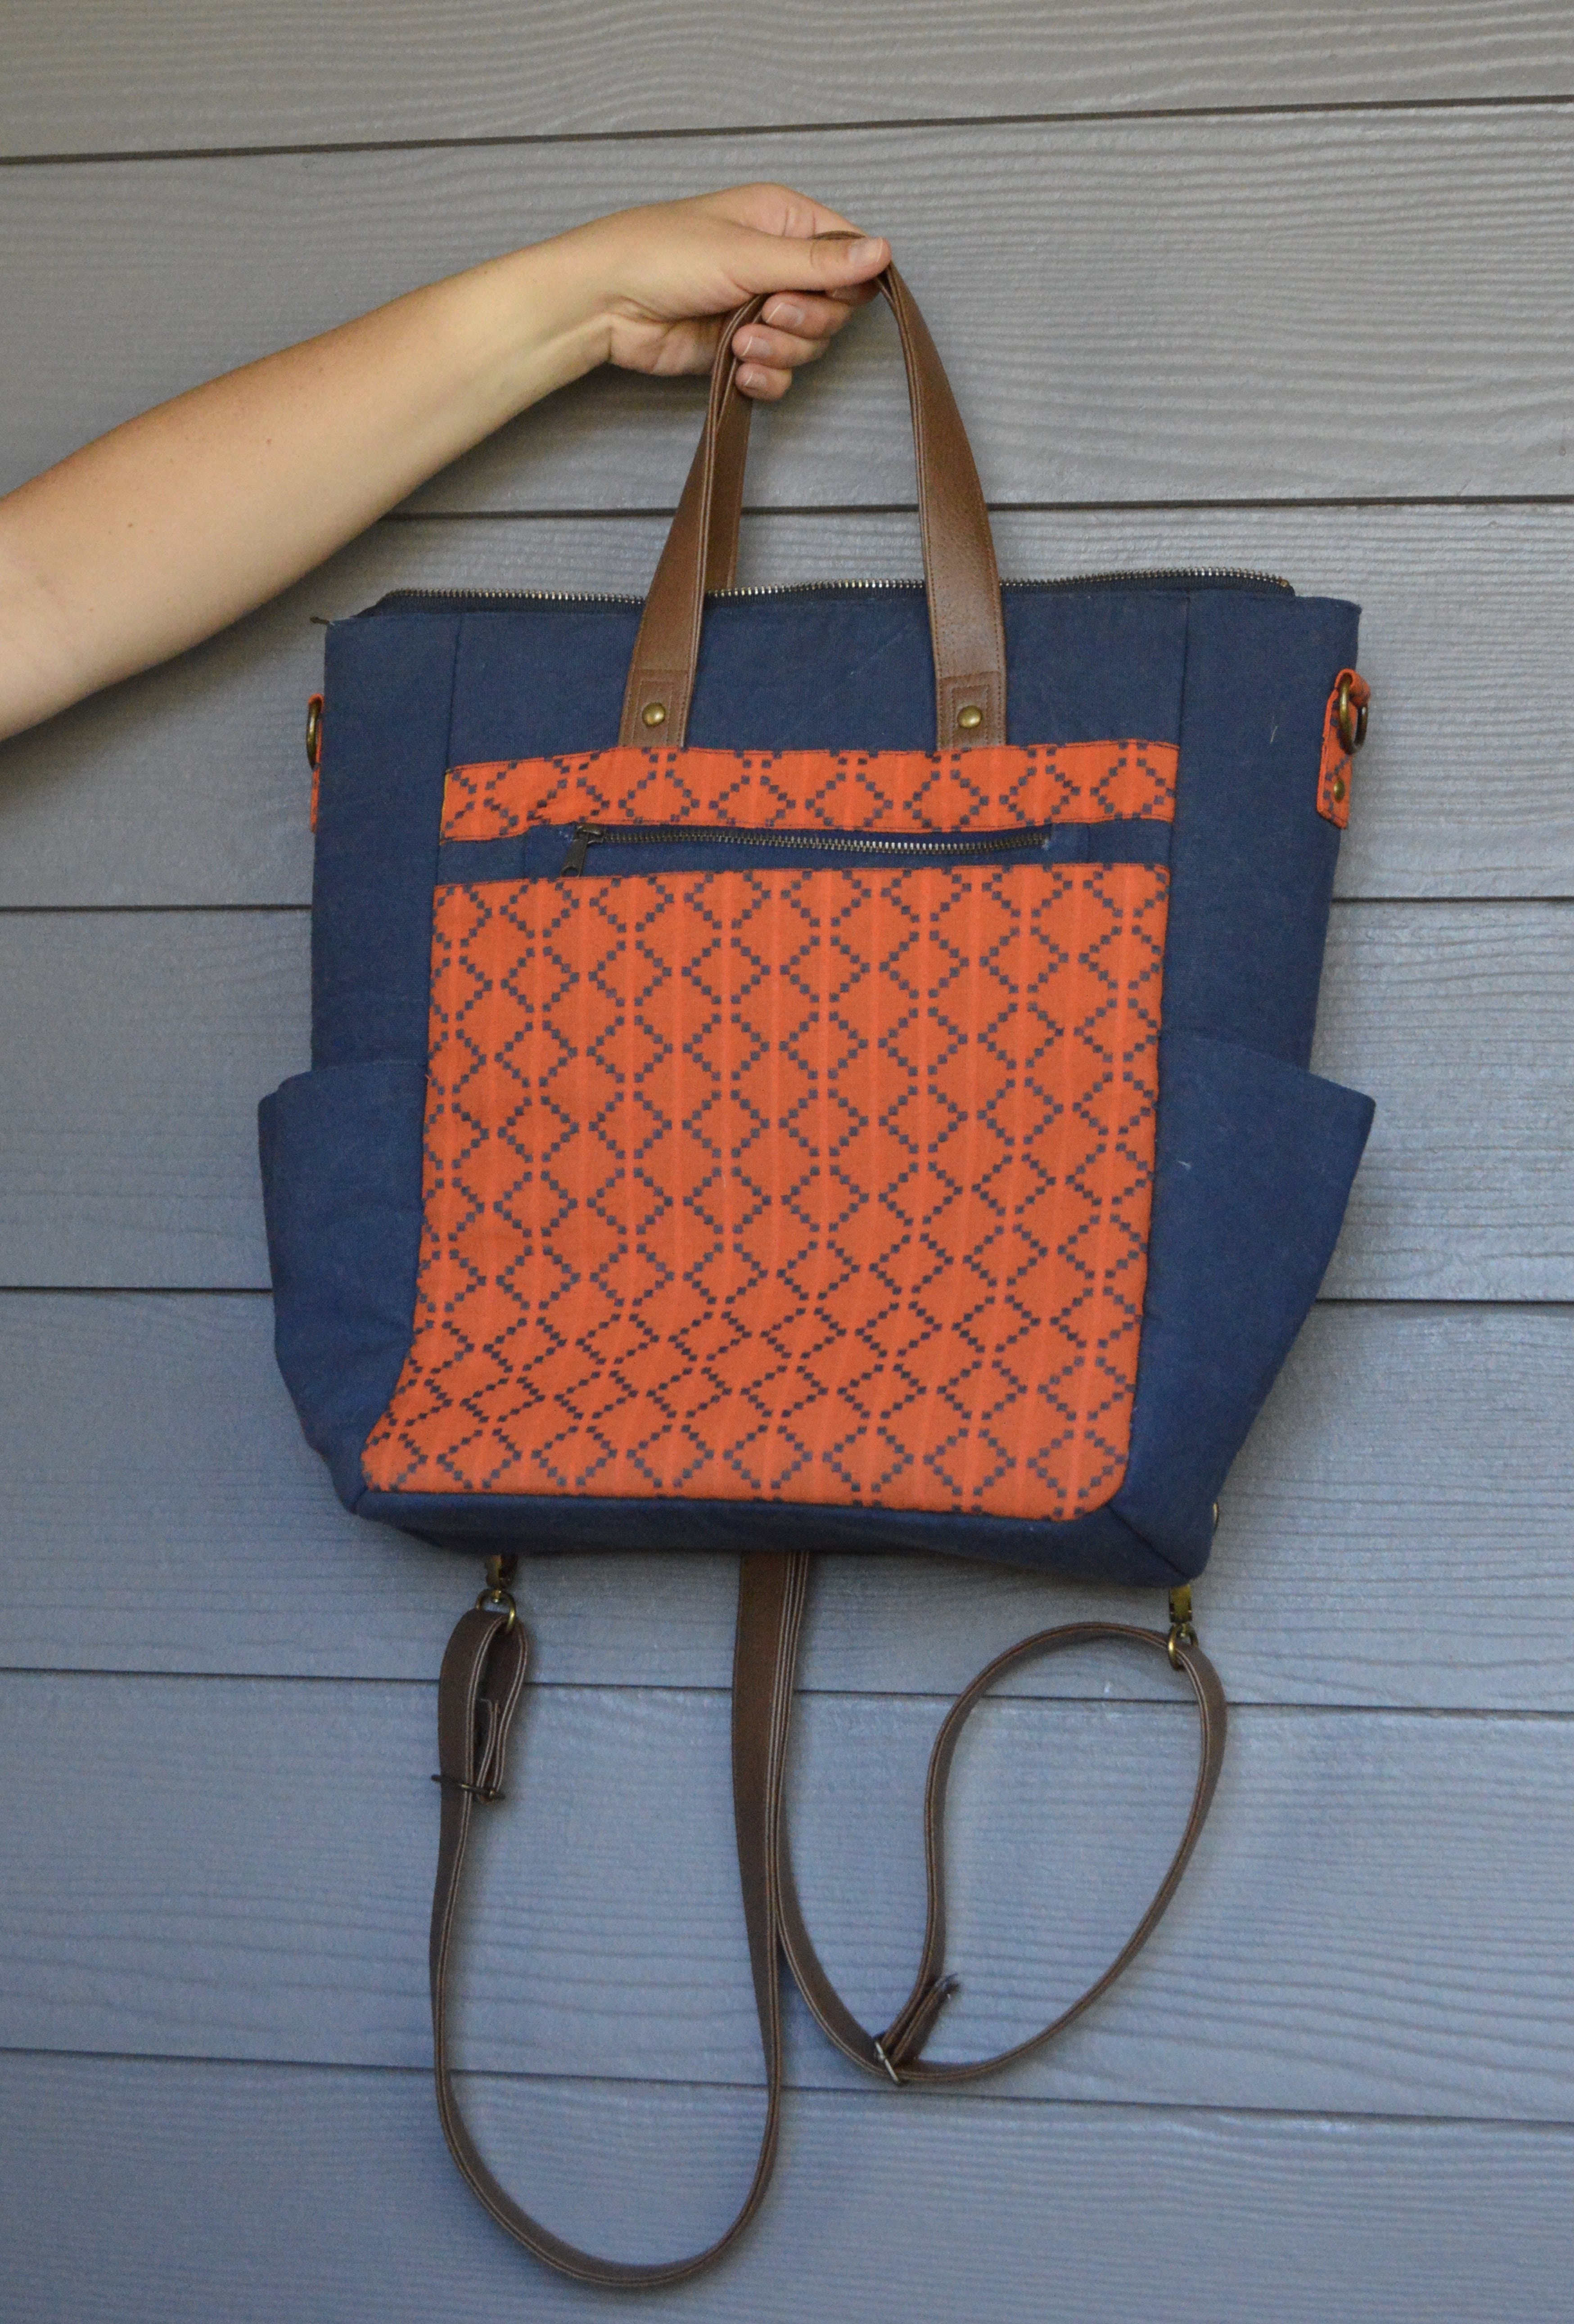
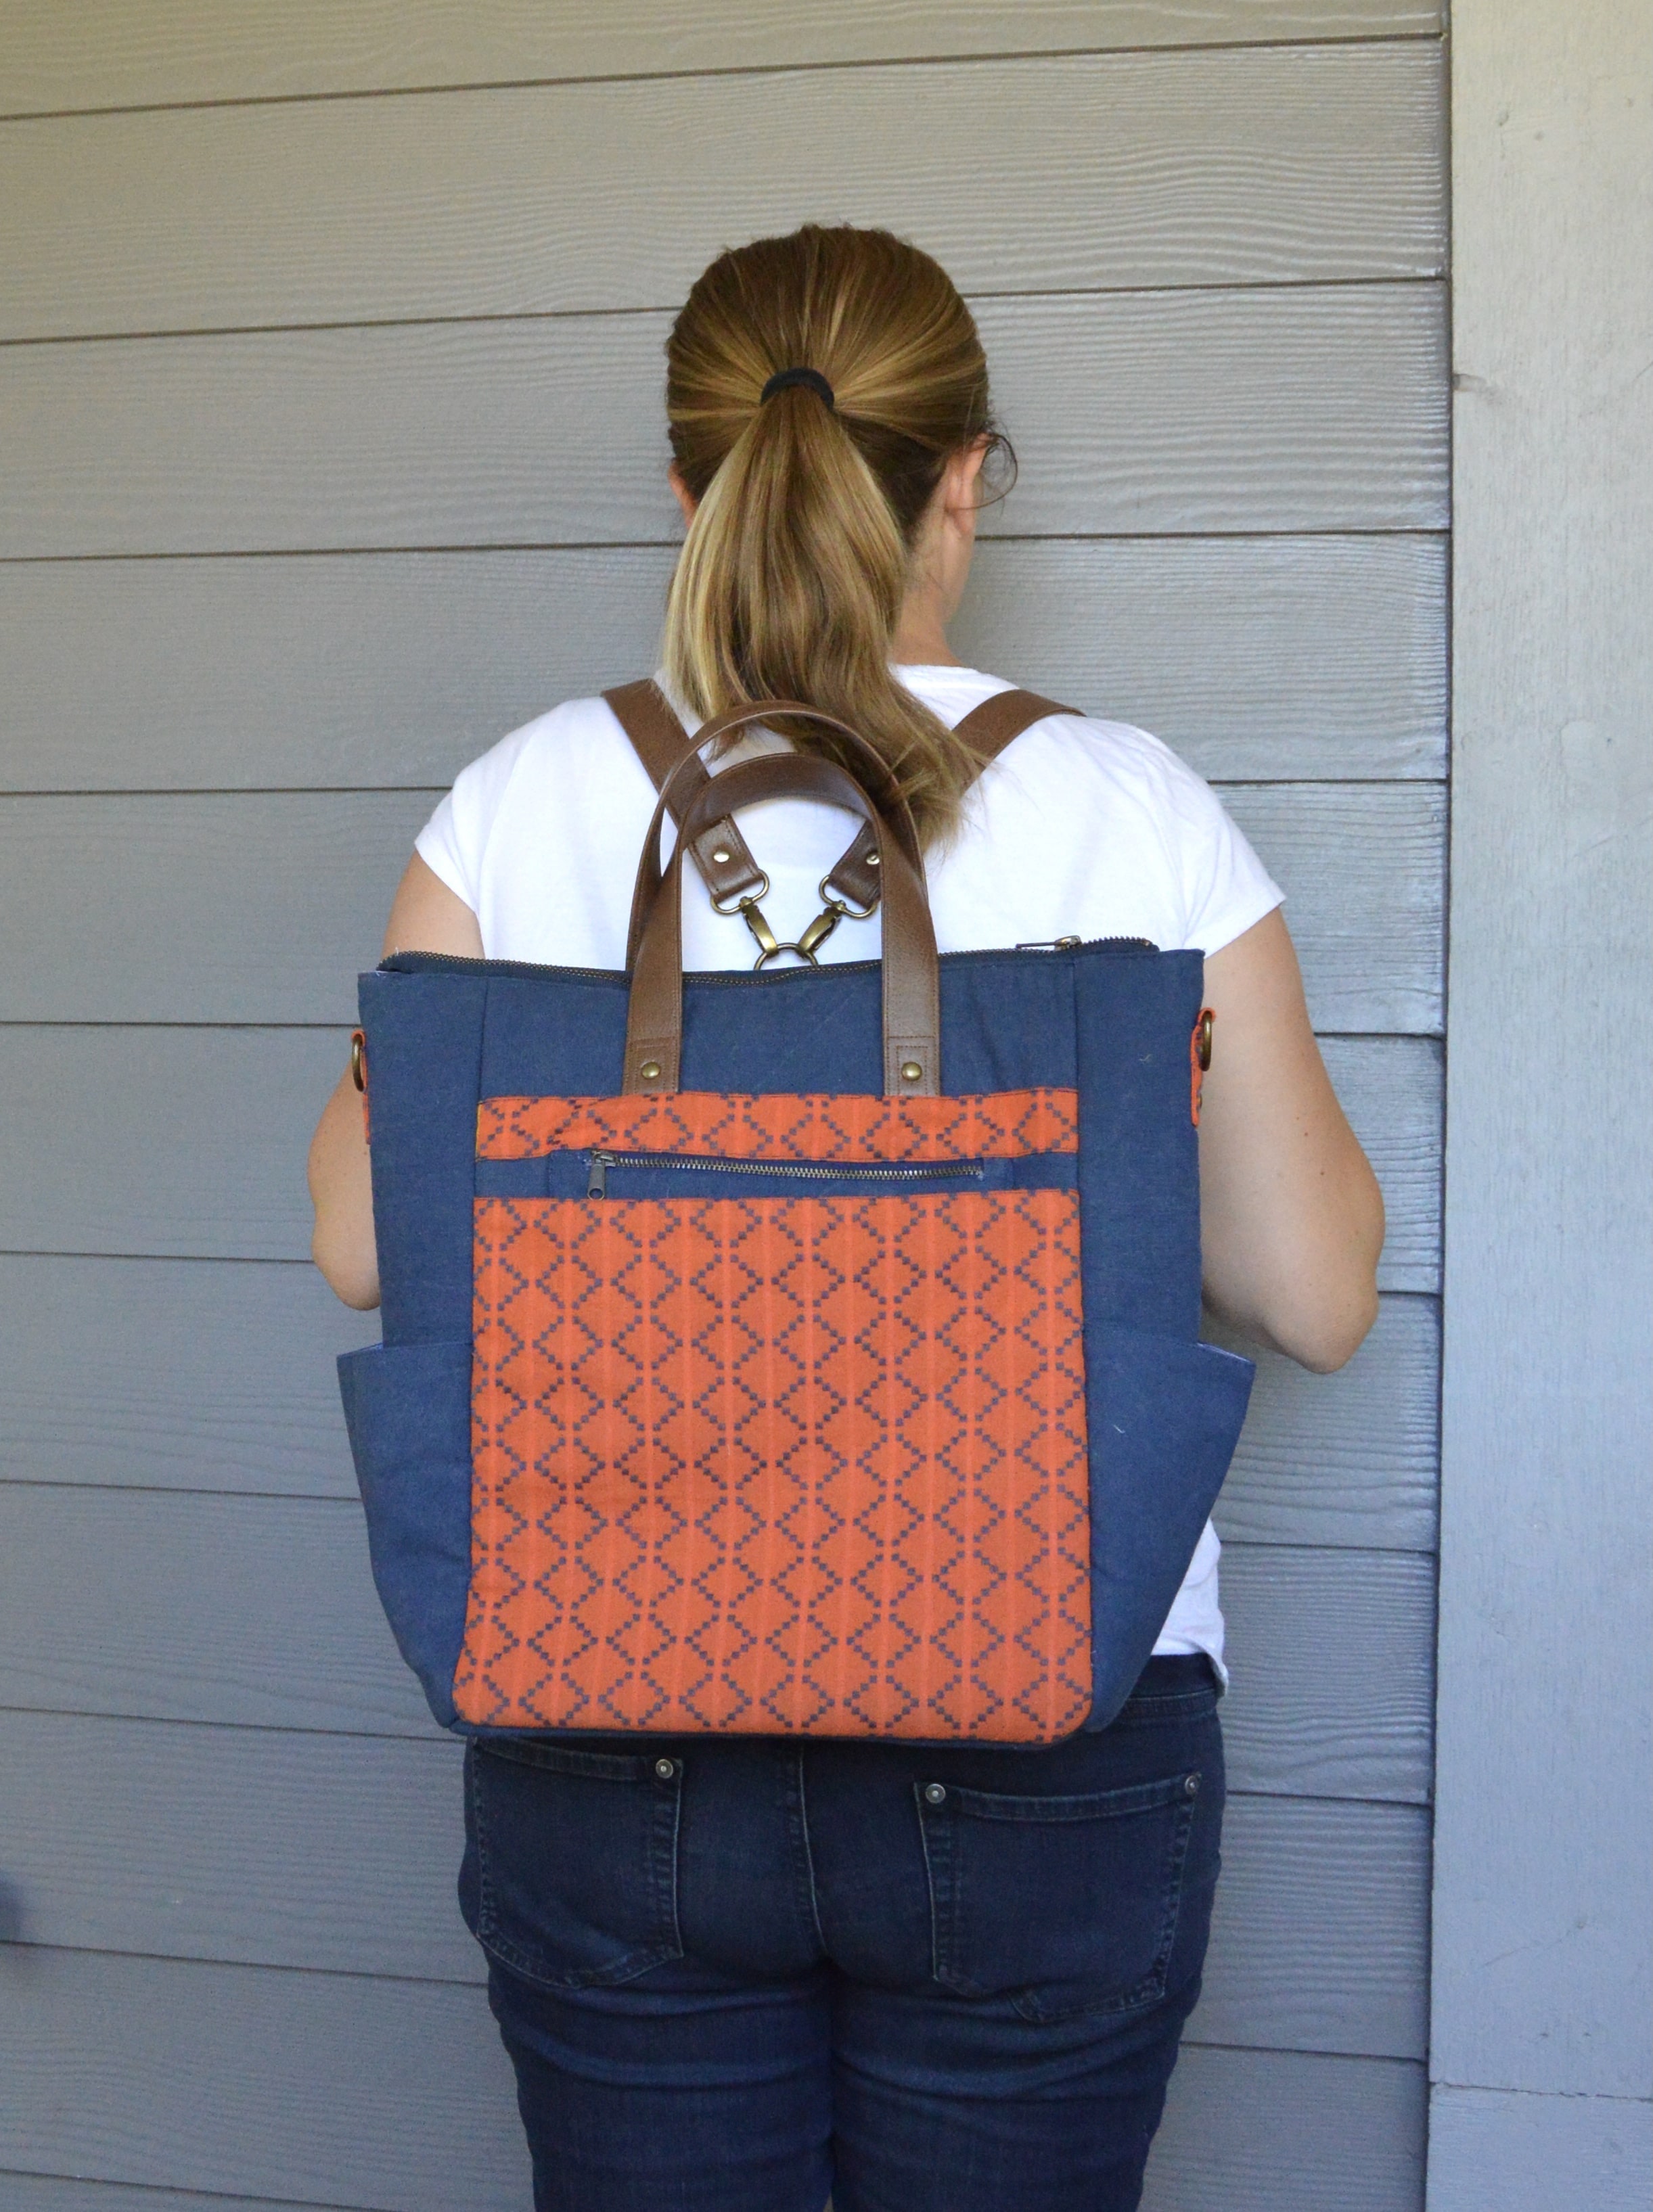
This was definitely a step outside of my comfort zone and it was a challenging project for me. But it was fun to try something new and I’m very happy with how it turned out. As mentioned above, one of my straps already busted (the rivet popped out) but before it even broke I was thinking I wanted to swap the vinyl straps for webbing instead. It won’t be quite as cute but the vinyl was too slippery; the straps were just falling down to the longest length which was getting annoying very fast. So I’ll go get webbing and make the change. I also didn’t originally make the cross body strap, but I’m going to include that when I change to webbing because I think I will use it that way occasionally. And, I mean, the cross body straps and backpack straps are removable so I’d rather have the option than not.
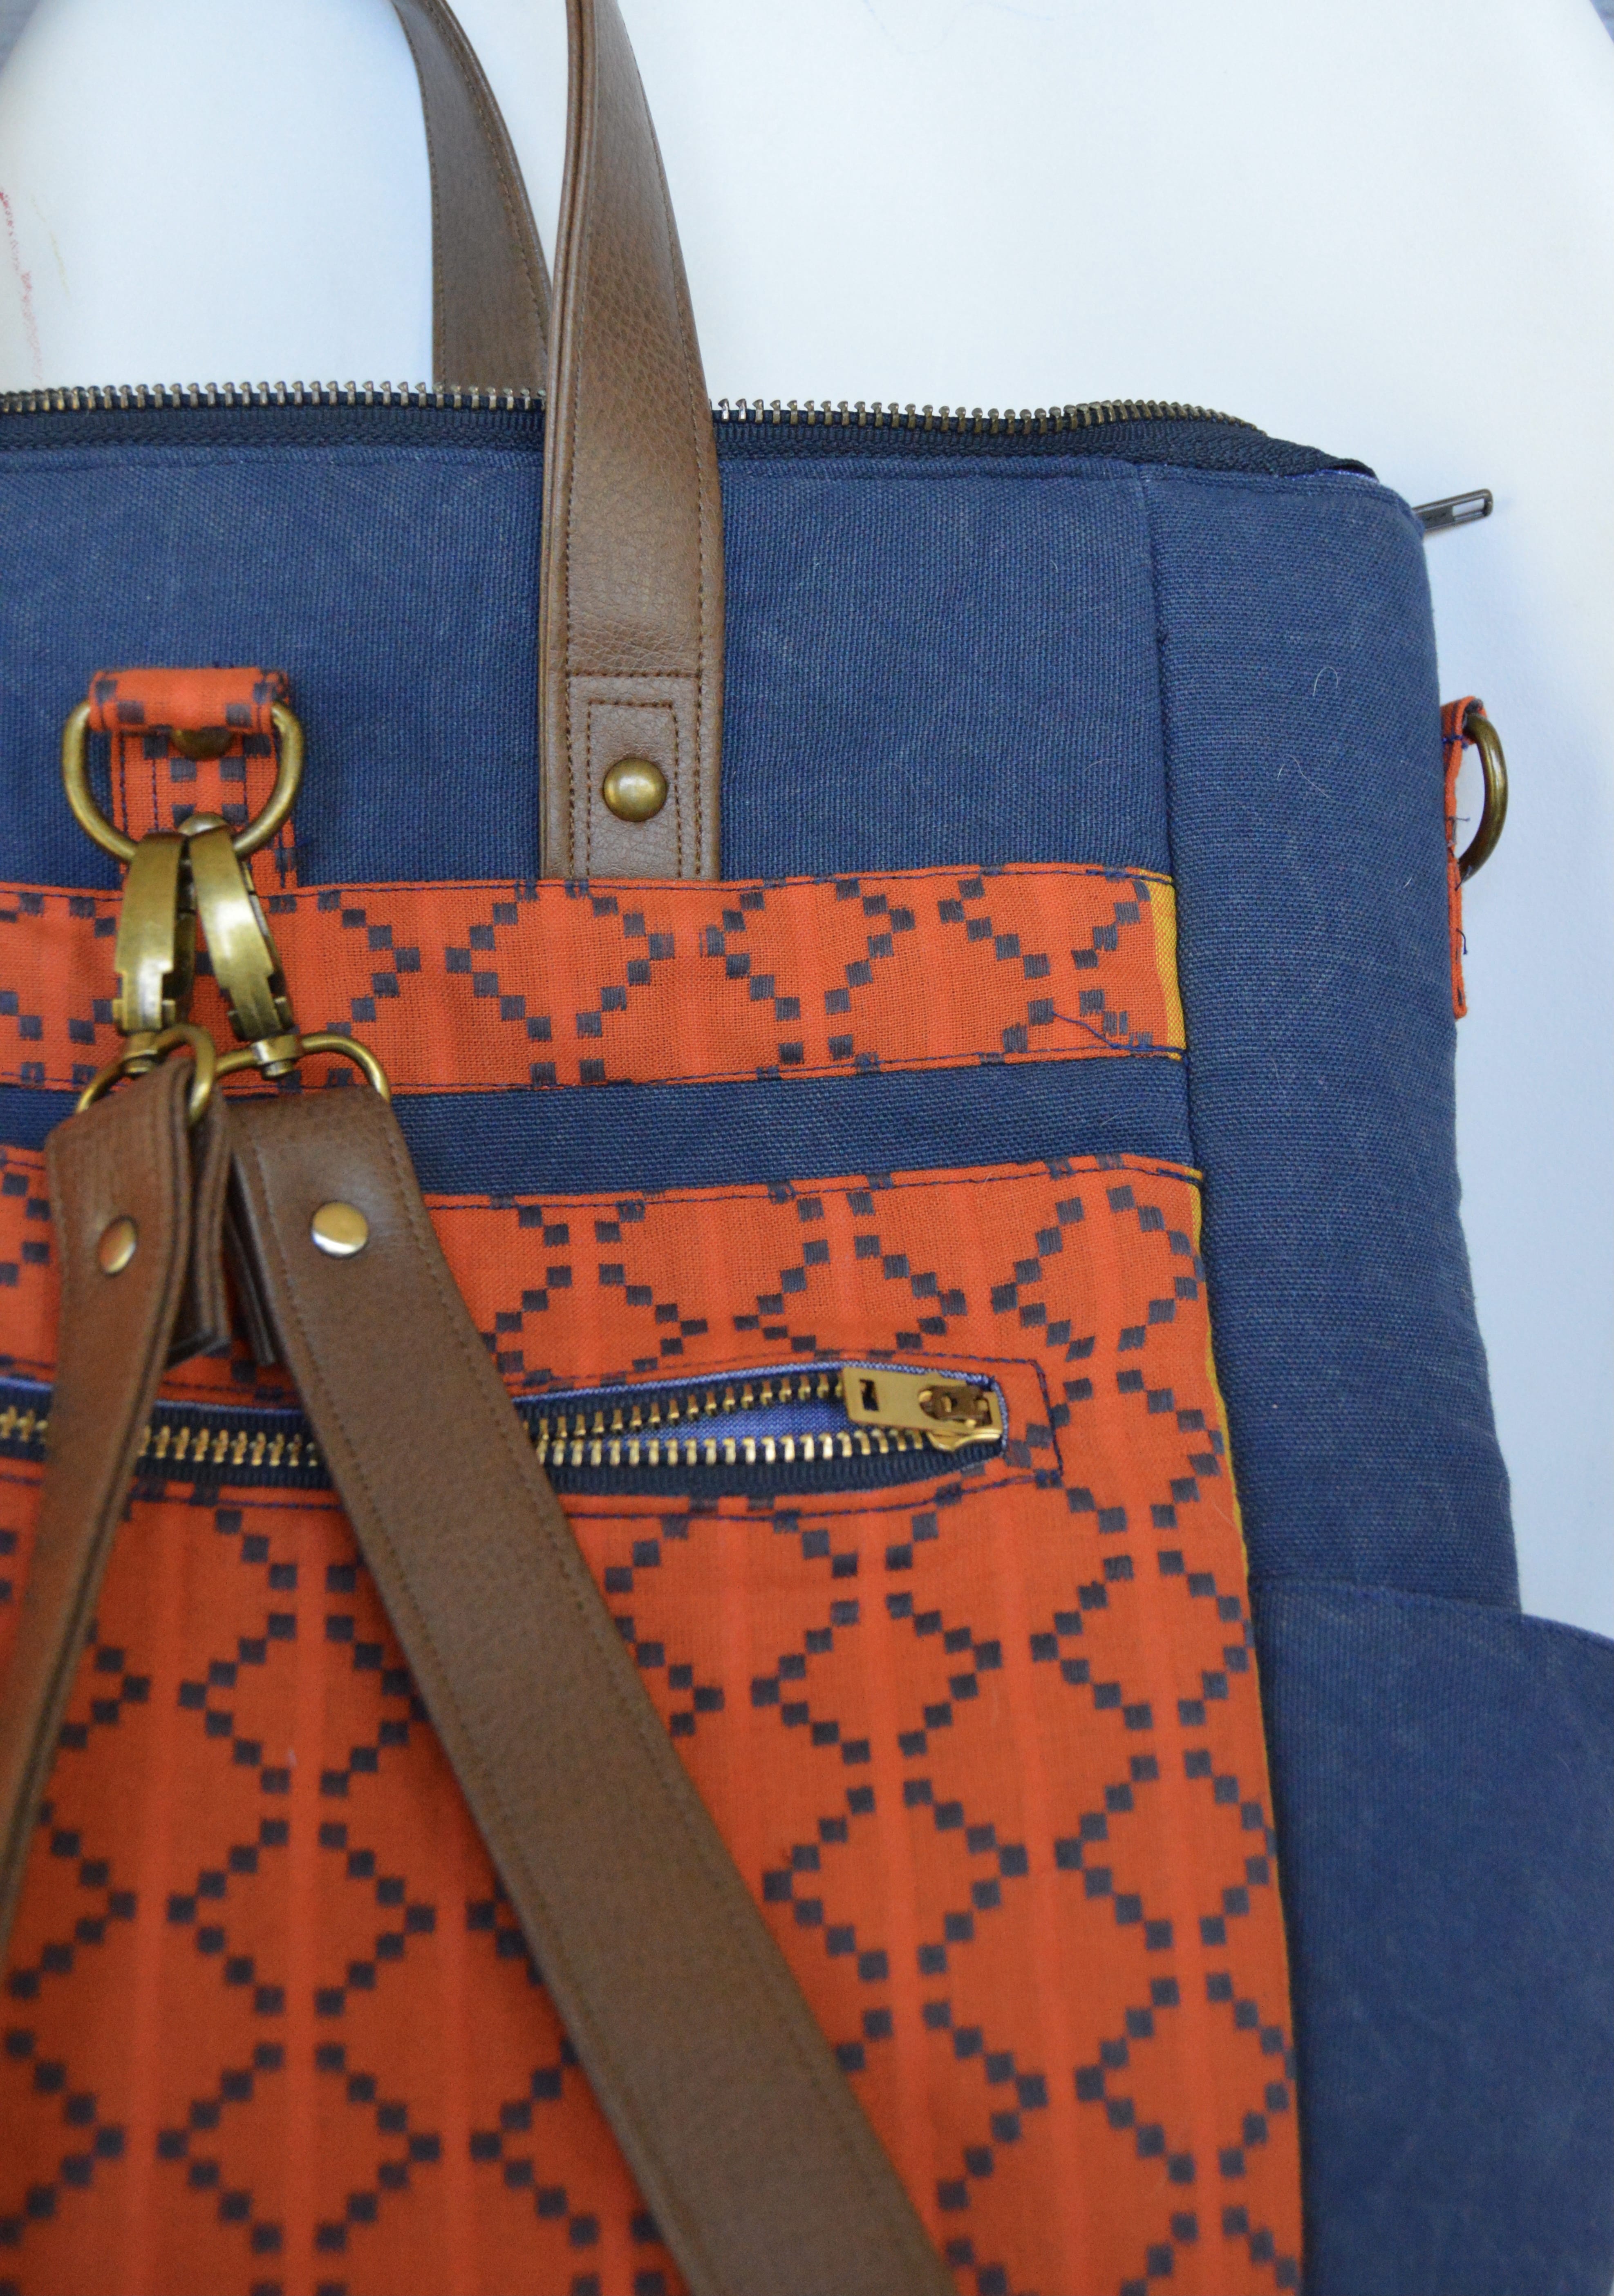
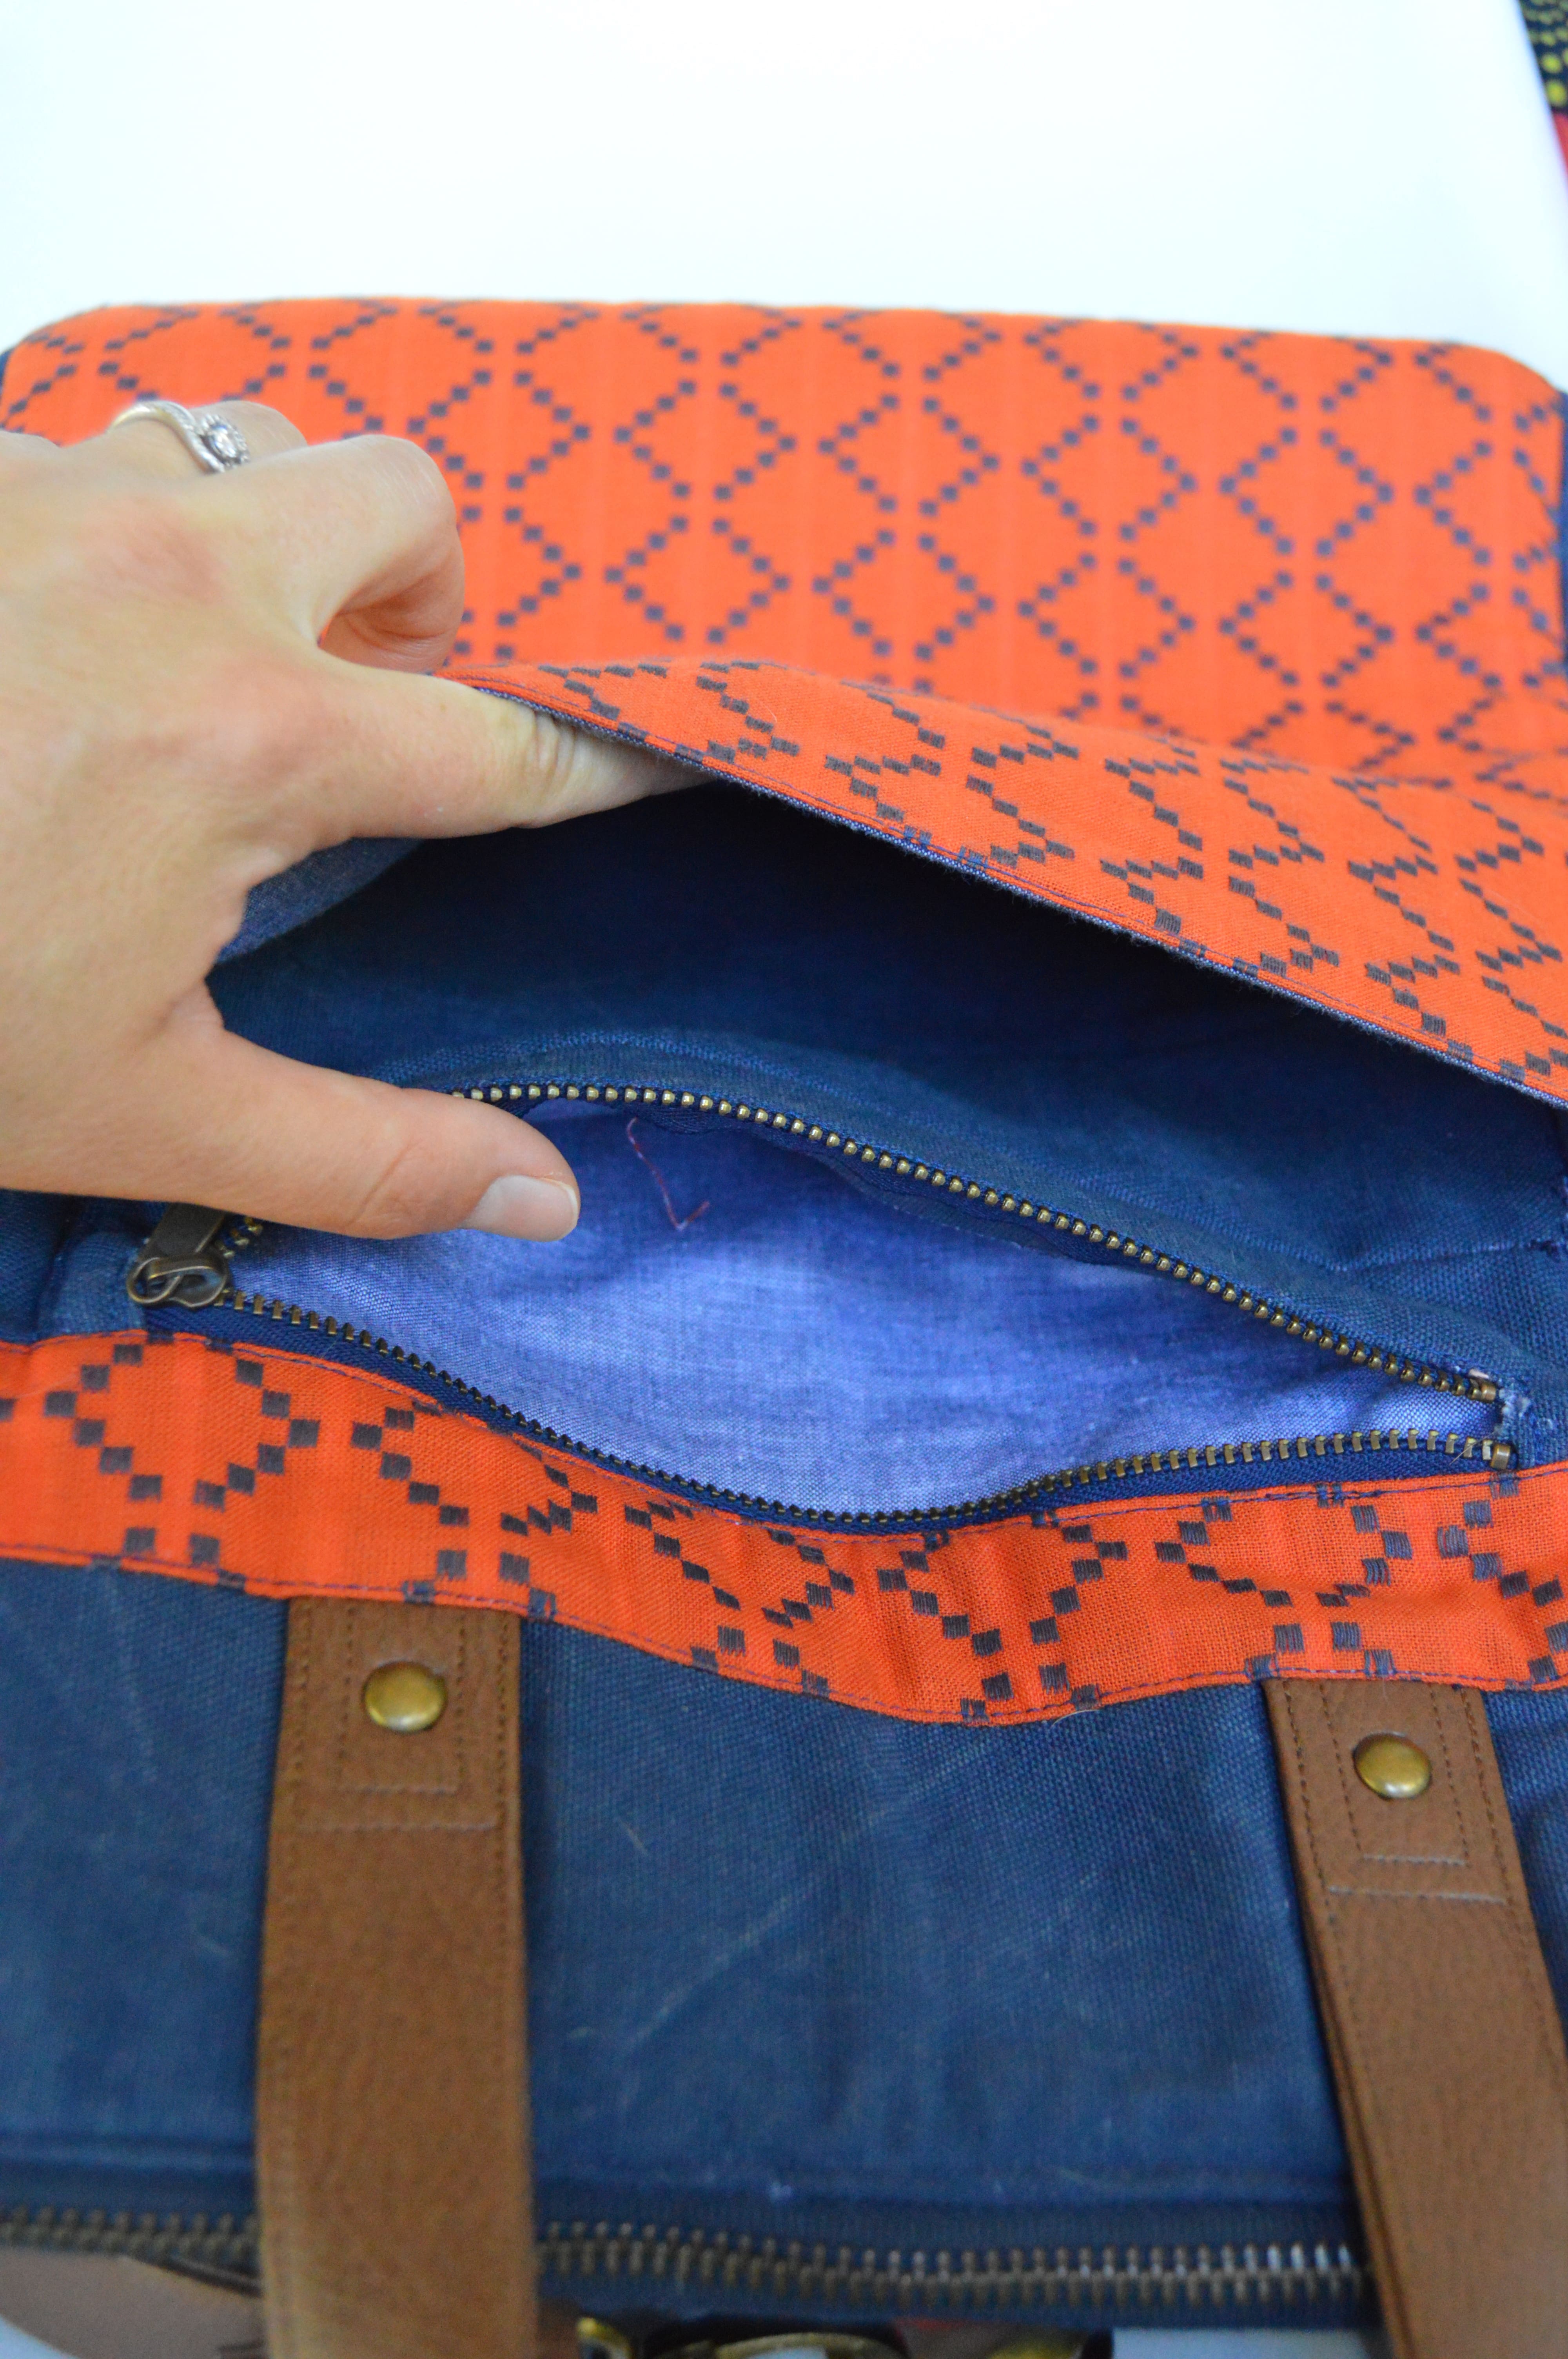
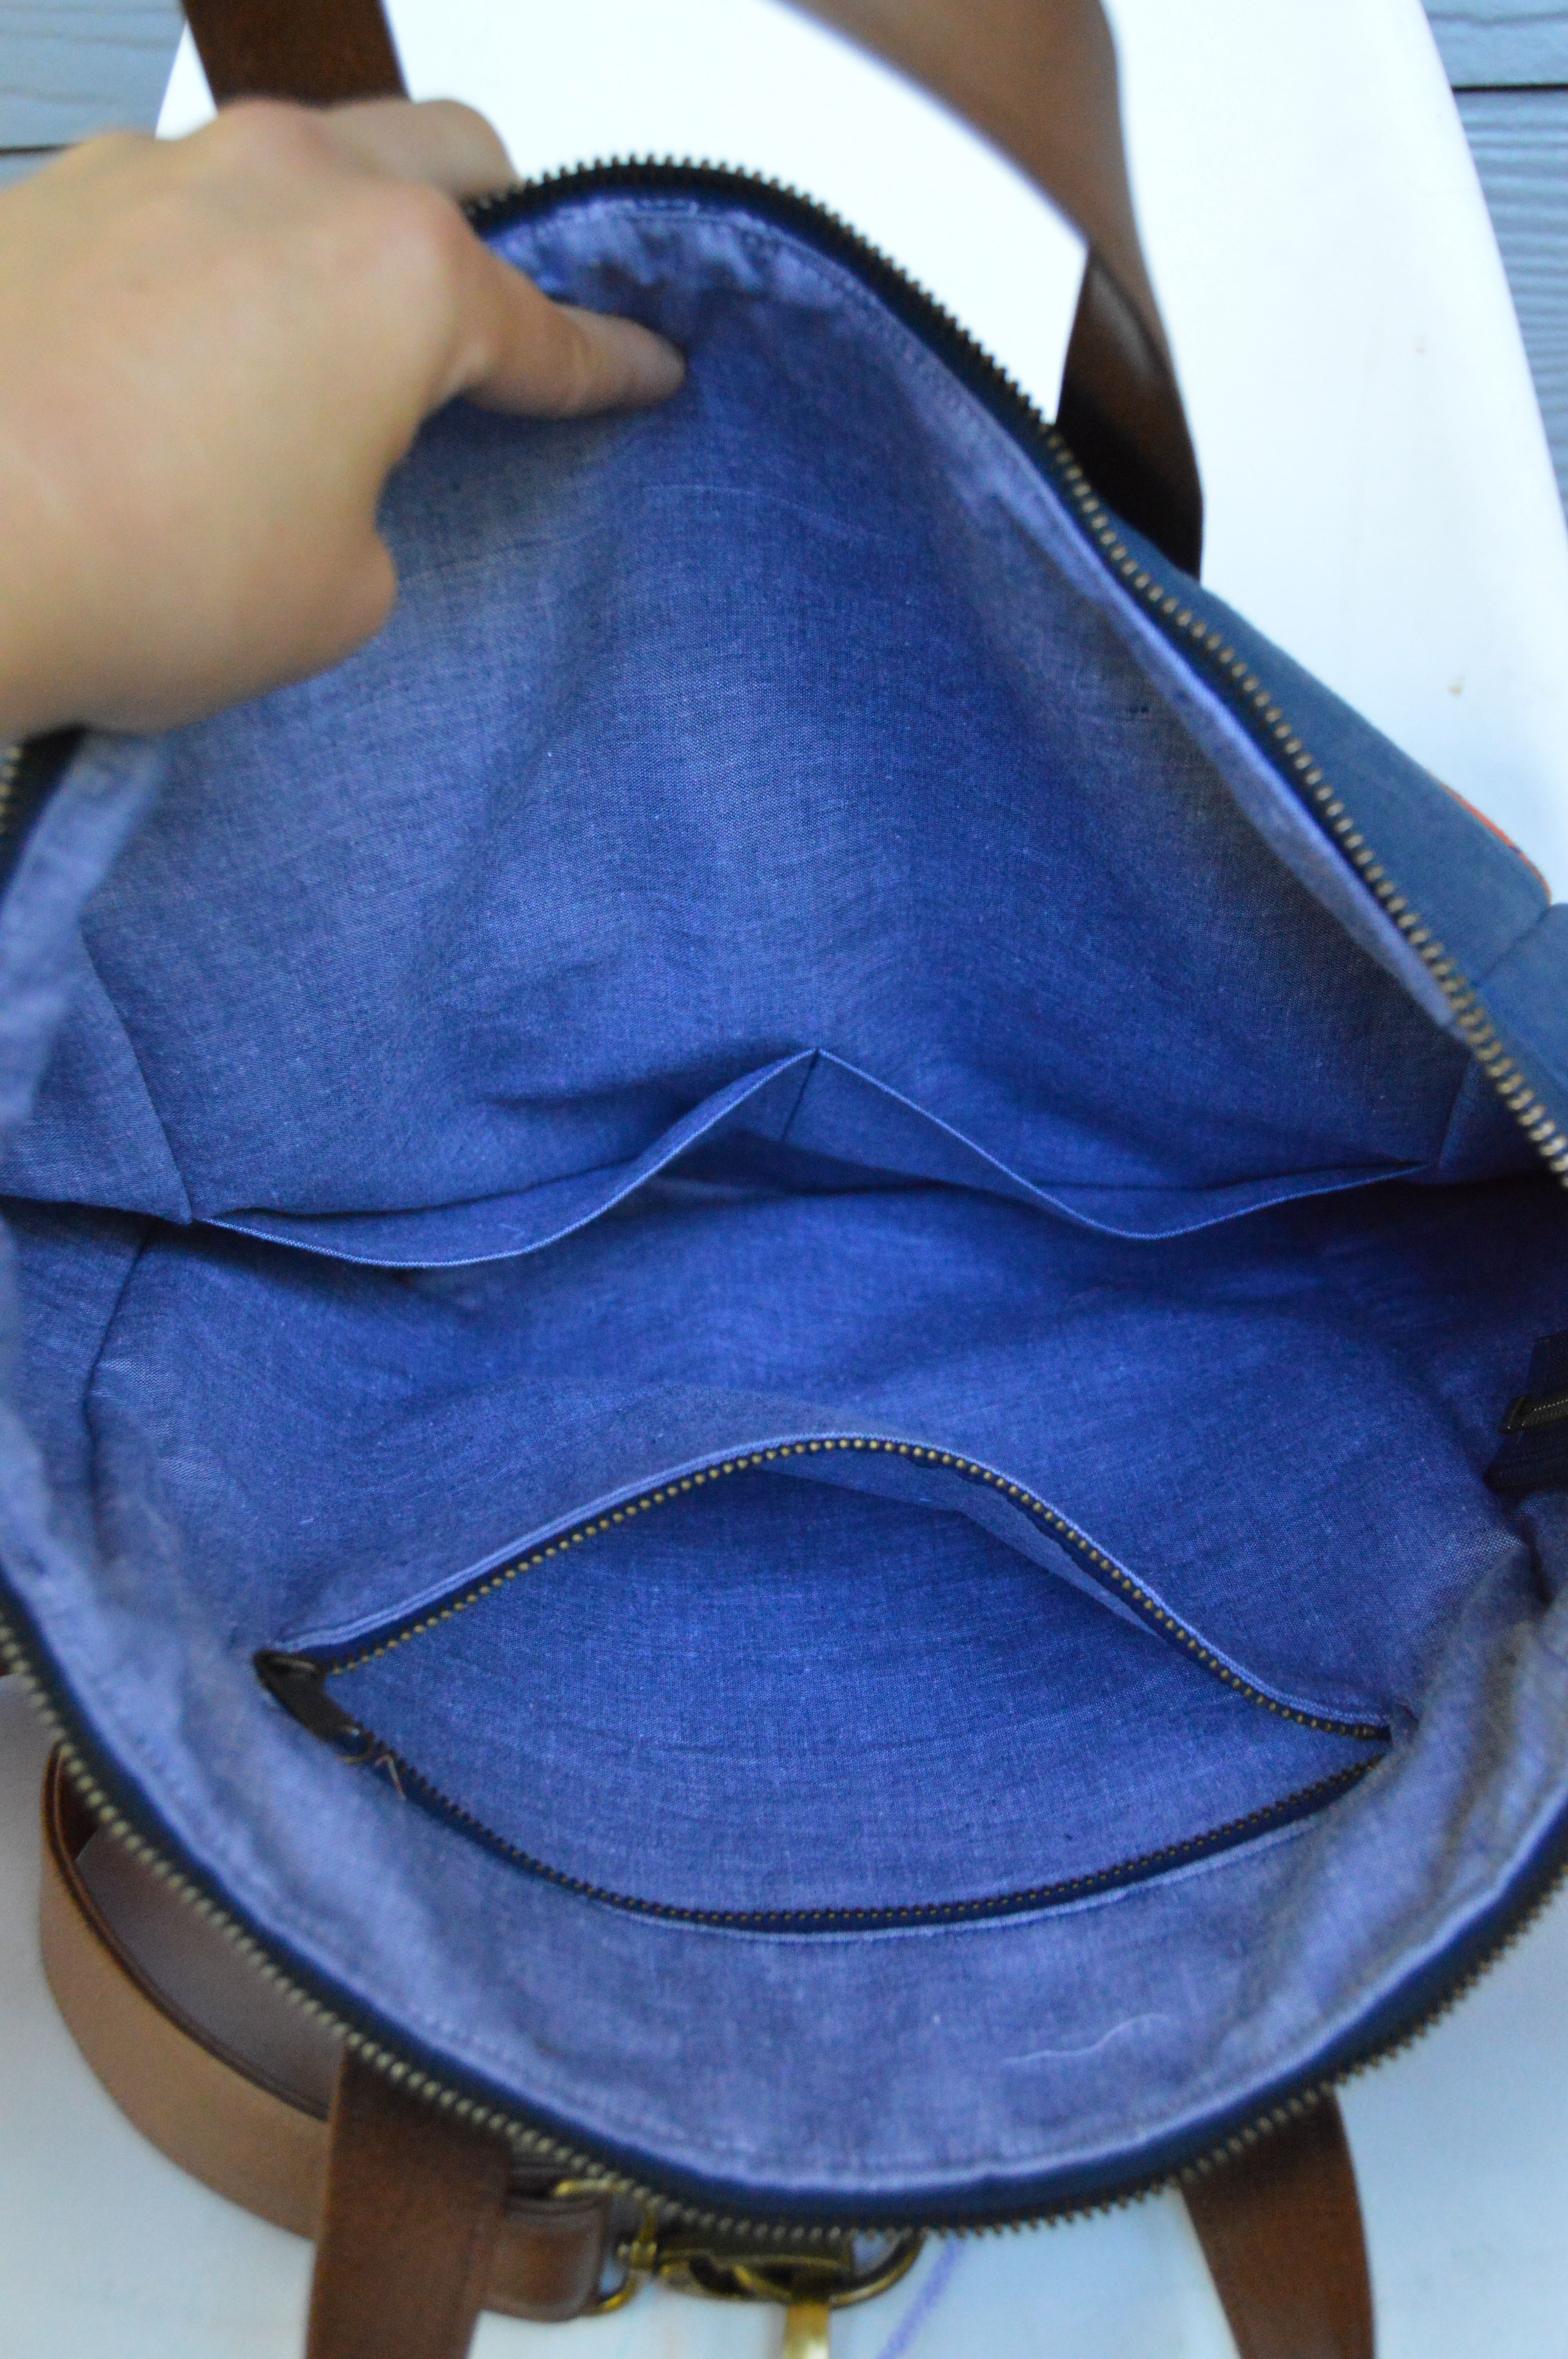
My favorite thing about the backpack is all the pockets! There are pockets everywhere, inside and outside, and it’s so handy to have access to so many zippered and unzippered pockets. I took the backpack with me on my trip to Boston and I loved that pocket on the back. While going through the airport, I kept the stuff I needed to have accessible right there in that pocket because it was easy for me to reach without taking the backpack off but no one else could have gotten to it. So handy! I also love the side pockets! They DO fit water bottles thankfully! That’s all I’ve ever wanted in life ;)! I was going to take a pictures of my backpack all full for my trip, but I forgot, sorry! But it does fit quite a bit and I think it will be just right for a diaper bag. Required a lot of materials and prep work, but it’s very cute and very functional.
Pattern: Trailblazer Backpack from Bagstock Designs
Adjustments: Omitted front flap
Fabric/Cost: See Cost section
Would I make this pattern again?: I would! I’d be interested to see how the end result changes by using different fabrics. Also, in the pattern, it’s mentioned that the foam stabilizer is optional; without you get a slouchier look. I’d be interested to see what that would look like, too!

I love this! The pattern, the fabric- all of it! It’s beautiful! I went through a phase where all I wanted to sew was bags. They’re super fun. Challenging, but fun. If you haven’t checked out Anna Graham’s (Noodlehead) bag patterns, you should. They are my favorite. I love her designs and her patterns are so well written and easy to follow. Now, I’ve got to go Google this Klum House bag that you so highly spoke of. 🙂
LikeLike
Oooh! I’d love to see some of the bags you’ve made! I’m going to have to try Noodlehead; she really has such cute stuff!
LikeLike