
")
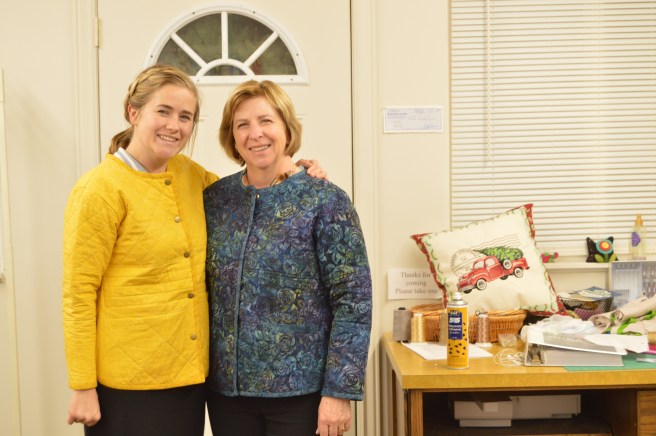
I have been dying to talk about this pattern! This has probably been one of my very favorite projects to date! When I bought the pattern, I knew I wanted to make a jacket for my mom, the queen of quilting. So I decided to make one for myself first to test the pattern out and practice the things I’d never done (welt pockets!). I finished mine in November and immediately started working on my mom’s. Mom’s birthday is just a couple days before Christmas, so keeping quiet was torture! Especially since every time I talk to my mom, she asks what sewing projects I’m working on. I was careful not to let anything slip because I wanted it to be a surprise. I think she was surprised and I also think she’s happy with her jacket!
Pattern: Tamarack Jacket by Grainline Studios
Sizes: I made mine in size 8, but it was huge on me and I took it in quite a bit. Knowing this, I didn’t want my mom’s to be too big, so I traced her pattern in between sizes 10 and 12. I dare say hers was a perfect fit.
Fabric: I bought my fabric-quilting cottons- from 35th Ave Sew & Vac in Phoenix. I bought the top and the binding fabric for my mom’s jacket at Cloth Plus Quilt Shop in Prescott, and the lining fabric at Odegaard’s Sewing Center here in Flagstaff. Her jacket is made of batiks, which is a dyed quilting cotton.
Cost: I love it when people include the cost of their makes, so I want to start adding that info here too. I didn’t keep exact notes on what I spent for this particular project, but I’ll give you estimates as well as a total (the prices were basically the same for each jacket. This is info for just one, not both):
Pattern: free from Slyvia’s Quilt Depot in Wasilla, AK
Fabric (outer, inner, and binding-totaling 5 yards): $50
Batting (from Joann): $8
Snaps (mine from Joann, mom’s from Odegaard’s): $6
Snap tool: $3
Thread: $3
Total estimated price for each jacket: $70
Would I make this pattern again: Yes, yes! A thousand times yes! (Not that I’ll make the pattern a thousand times…).
Let’s dive in, shall we?
So, like I said, I knew that I wanted to make this pattern for my mom but I thought making one for myself first would be for the best, darn it. You guys know how much I hate making clothes for myself. Haha jk, I was really excited to be guinea pig, as always.
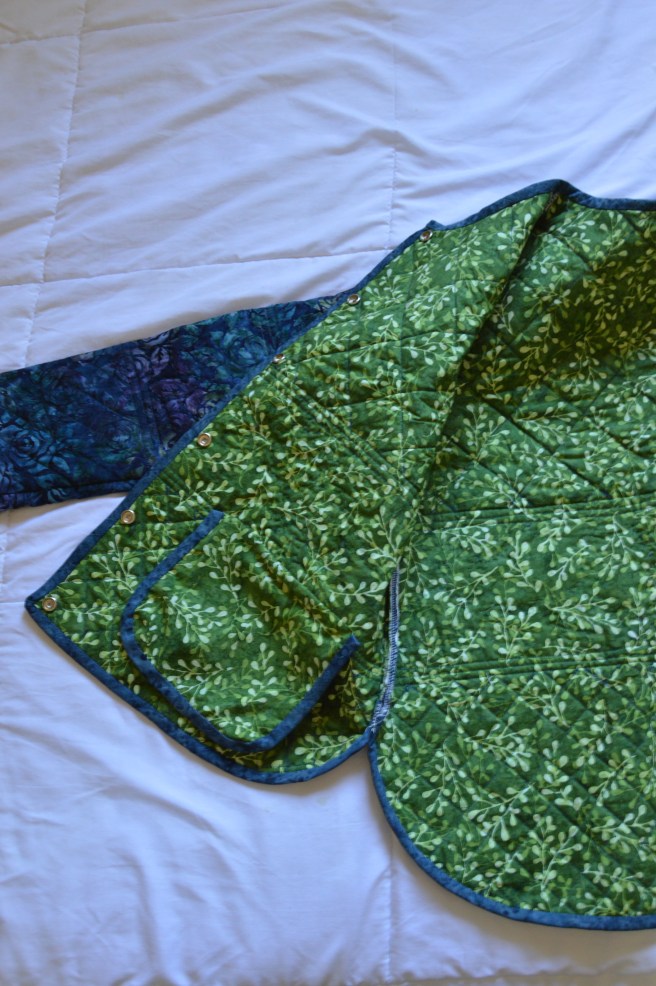
I had to make a couple choices though. First, I knew I was going to quilt my own fabric. You can buy quilted fabric to make this jacket, and there are some great options for this. But my mom runs her own quilting business so I really wanted to quilt it myself, as best I could, so that the quilting could be varied. I also wanted snaps, even though they terrified me. And, although I’d read reviews that suggested just doing a patch pocket to make things easier, I really wanted to go ahead with the welt pocket.
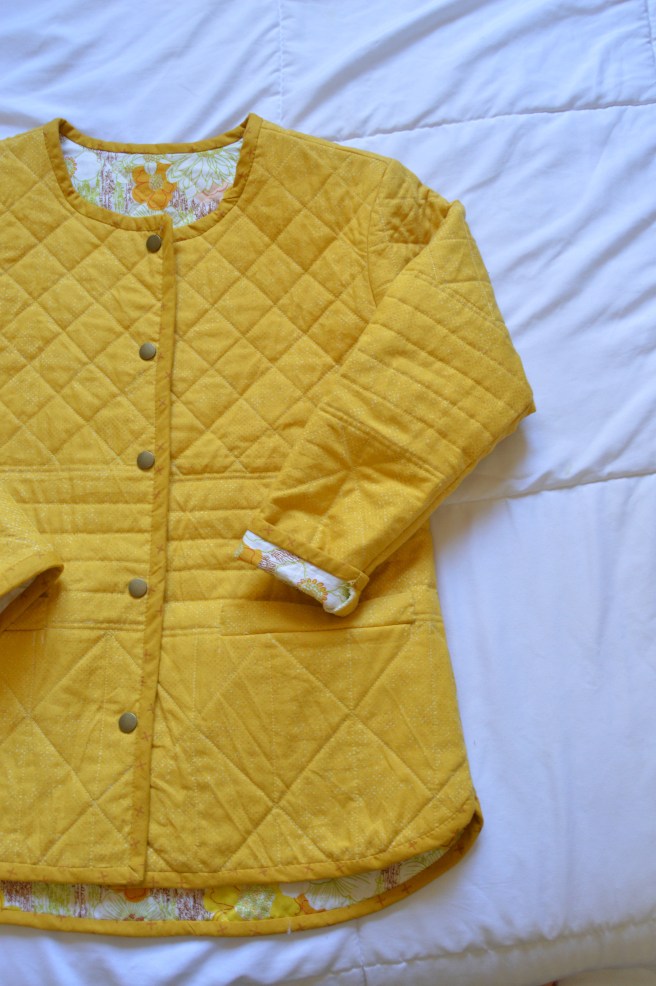
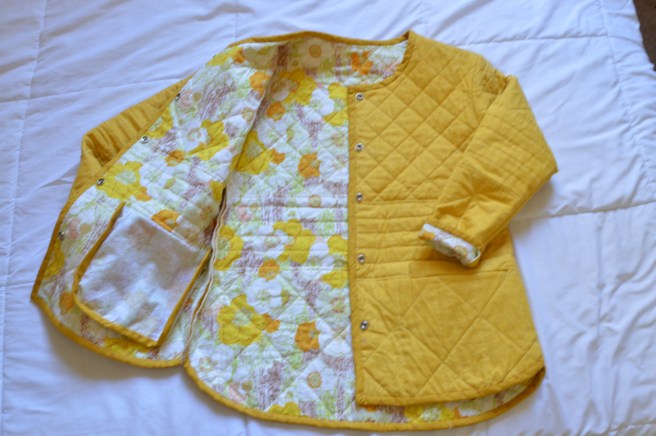
 Also, for whatever reason I got it into my head that I really wanted my tamarack to be a mustard-y yellow. I discovered pretty quickly that that is not a popular color among quilters, because I couldn’t find it anywhere! I wanted my mom’s jacket to be made out of nice fabric, but I wasn’t going to be so picky about mine. But it turned out that I had to be picky because nowhere local had what I was envisioning (stinking visions!). We stopped in at 35th Ave Sew & Vac in Phoenix on a whim and I’m so glad we did! That store is amazing! Definitely stop by if you’re a quilter and in Phoenix. They had several options that I liked. My outer fabric and binding came from a line from Moda called…wait for it…Safari Life! Ha! But it really was the shade I had been hunting. I can’t remember what fabric my lining was, but I love its kind of 70s vibe plus it was on clearance.

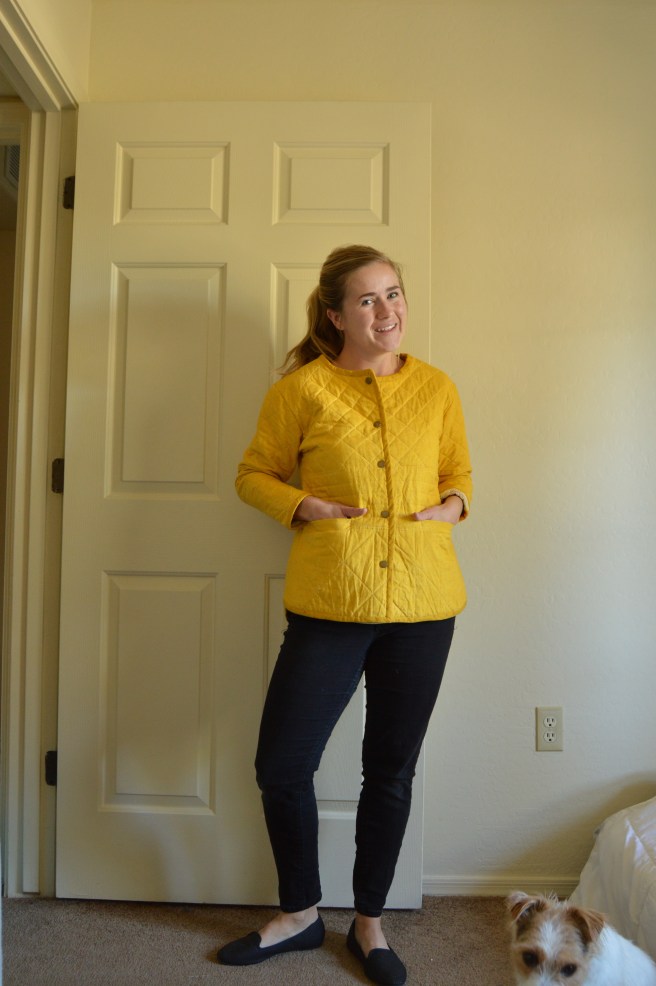
So quilting this thing was really, really fun and also a bit of a headache. If you search the tamarack jacket hashtag on Instagram, you will be blown away by the amazing job people have done on the quilting. I whipped out the top third of the quilting on all my pieces in no time. But after that I felt really unsure about what to do. I thought it would look awesome to have some curvy quilting but my machine (not to mention myself) was incapable of what I had in mind. I sat on it for days and ended up just doing horizontal lines in the middle. The bottom is just like the top but on a bigger scale and with vertical lines (which was a product of doing vertical lines but not liking it and not wanting to unpick everything). In the end, I really liked how the quilting turned out. It was something I’ve never really done on my machine but it was a lot of fun.
Just a bit more about quilting on a sewing machine: a walking foot is a very good thing to have if you plan on quilting on your machine. It is designed to feed lots of layers evenly through your machine and it can seriously make the biggest difference. A walking foot for my machine is very expensive. My mom had given me a walking foot a couple years ago but it was the wrong kind. I got a cheap adapter for it but even then it was a really tight fit on my machine. I just made it work and was able to quilt my entire jacket with minimal problems. But it started giving me issues when I got around to quilting my mom’s jacket, so I just used it for basting stitches down the middle and then used my regular foot from then on. It worked okay-no glaring errors-but a walking foot is on my list now. I really think it’s essential even if it’s just on those basting stitches, but if you can swing it, get one and use it on this whole project and lots of others (not just quilts-I’ve heard they’re also great for jeans and coats-pretty much anything that has more than 2 layers of fiber).
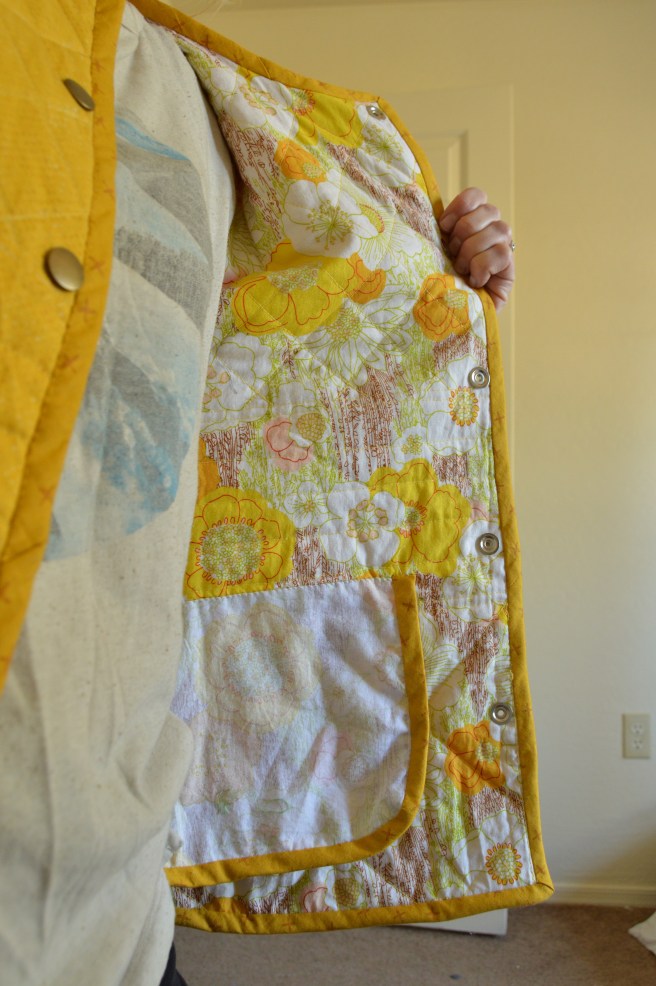
I learned while sewing mine that the instructions have you put your pocket pieces with right sides together-which is how you want it for most thing where others never see the pocket bag (think dresses and pants). But here, where others might see a glimpse of your jacket interior, I think it’s preferable to have the wrong side of the fabric on the inside of the pocket. I followed the instructions, so you can see the wrong side of the fabric. Next time I will do opposite of what the instructions say (and would advise you to do the same if that’s the effect you want). On my mom’s jacket, this didn’t matter since the wrong side of a batik isn’t really noticeable.
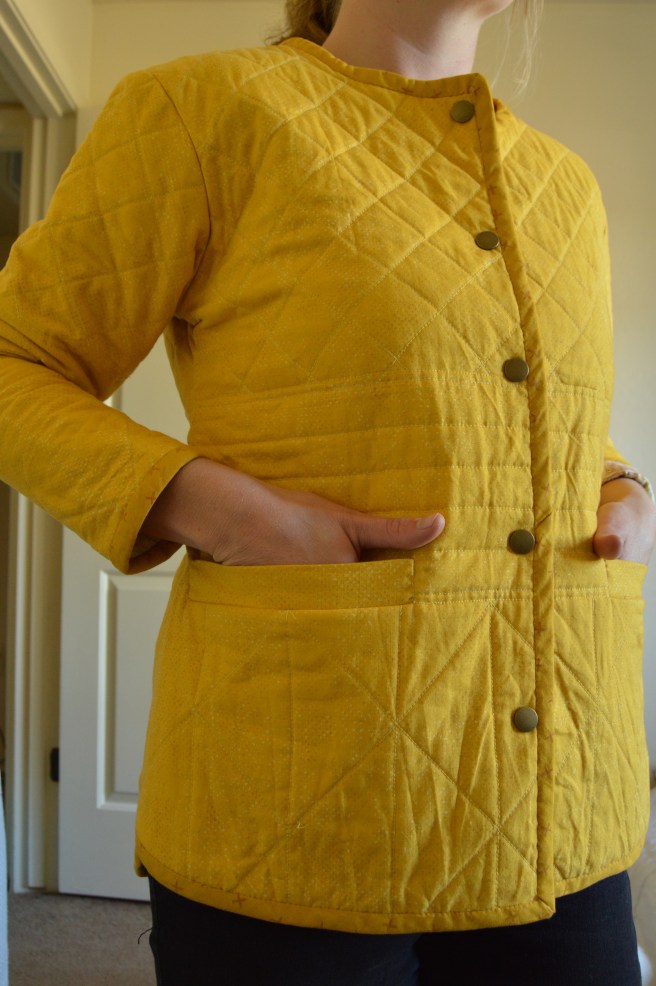
I love the welt pockets on these jackets! I was really worried about them (you have to cut a hole in your freshly quilted pattern pieces!) but following the instructions, one step at a time, results in a really beautiful pocket. I literally danced around my bedroom once the pocket was inserted correctly. I did have to look up the tutorial online, because the instructions in the booklet weren’t cutting it-I was pretty confused. The tutorial really clarified things for me. I would suggest reading through the entire tutorial very first to just kind of understand the process and then go back then just read and follow one step at a time.
I created my own bias strips and I sewed the bias strips onto the backside and then hand stitched them to the front side. I think that might technically be incorrect. Maybe you want the hand stitched parts on the inside where they are less visible? I don’t know. But I think I loved making these jackets so much because it combines apparel sewing and hand sewing into one amazing project. A lot of people talk about slow sewing-a concept that highlights enjoying the process of sewing and not just the end result. I feel like English Paper Piecing has really made me appreciate and enjoy the relaxing nature of hand sewing. You can’t whip something out quickly when you’re sewing by hand, so you really have to love what you’re making. I hand stitched the binding, the welts to the jacket and the top of the pocket on the inside of the jacket so that it has a cleaner finish.
When I tried my jacket on for the first time, it was huge! I’ve found, even in indie patterns, that I tend to want at least one size down from where the measurement charts place me. I realize that I could have saved myself the grief of having too big a jacket by doing more thorough measurements, and by comparing those to the finished product measurements provided in the pattern. Ce la vie. It was discouraging after all that work, but it just meant more time on this great project haha! I turned the jacket inside out and safety pinned where I wanted the seam to fall. I hand basted it and then tried it on. After I confirmed the fit I finished seams again and resewed the coat. I ended up sewing my sleeves without enough ease. It’s fine if I’m wearing a tee shirt underneath, but it doesn’t really work with layers. Maybe I’ll let it out a little someday.
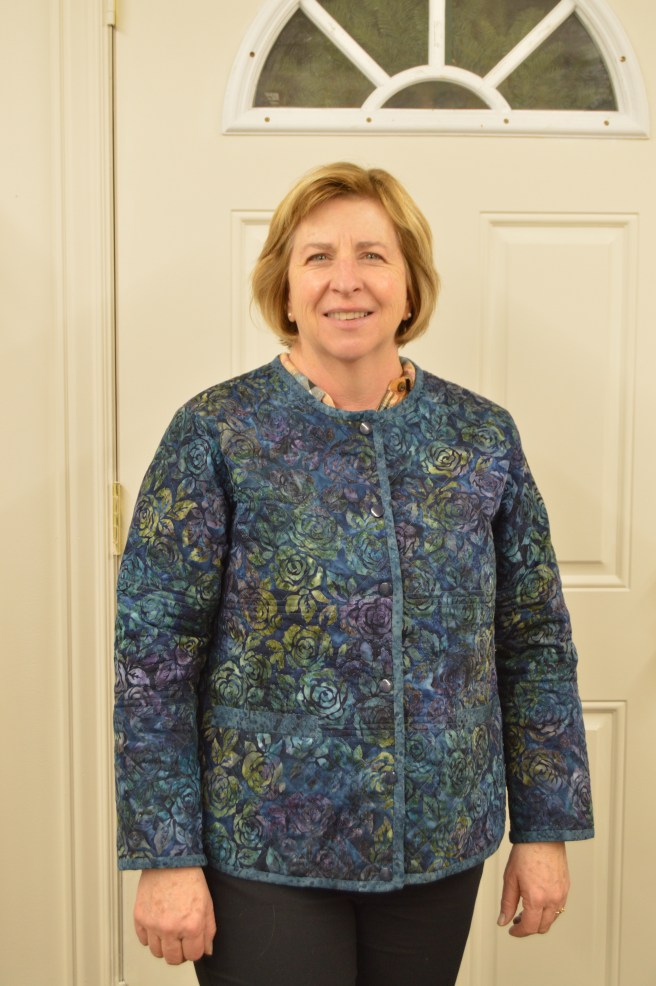
When I started sewing up my mom’s, the main thing I had to note was not getting the size too big. I think her measurements put her at a size 14. I knew this would be too big, so when I traced the pattern, I traced in between sizes 10 and 12 and I felt like that would give her enough ease to be comfortable and to be able to layer, but not so much that she was swimming. The fit, in my opinion, was perfect. Did I mention that I used a paper pattern for this? This was my first ever indie paper pattern. I’ve gotten used to printing the pattern and taping it out. To preserve the paper pattern, I traced the pattern pieces onto freezer paper. I know there’s a huge debate about which is better, and I can honestly say that I enjoy doing both those things. I’m a weirdo.
Mom’s fabric also proved very tricky to find. I didn’t have anything so specific in mind for her jacket but I knew I wanted something darker and more neutral and I knew I wanted to use batiks-that seems to be one of my mom’s favorite fabrics. Mom’s favorite color is green, so I also wanted to use that somehow. I searched a couple different fabric stores and couldn’t find anything I felt good about. So I loaded the kids up and headed to Prescott-to Cloth Plus (a gem of a store)-and luckily was able to find this gorgeous rose batik. I was a little worried, because it was a little more bold than I had planned for, but it honestly was so beautiful I felt like I couldn’t say no. I went for it and found a lining at Odegaard’s here in Flagstaff.
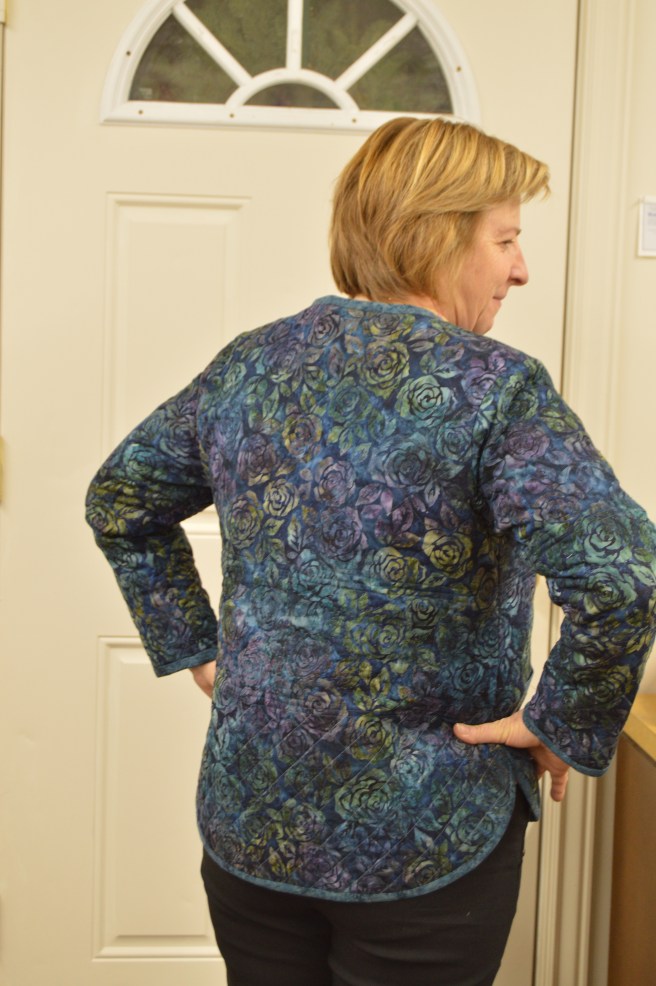
I feel like quilting this one was easier because I knew what I wanted for the top and bottom. I ended up deciding to do hand quilting for the middle. It took quite a bit of time. I like how it turned out but, honestly, hand quilting is not a strength of mine and I’m not entirely sure it was worth the time I put in. In any case, it turned out.
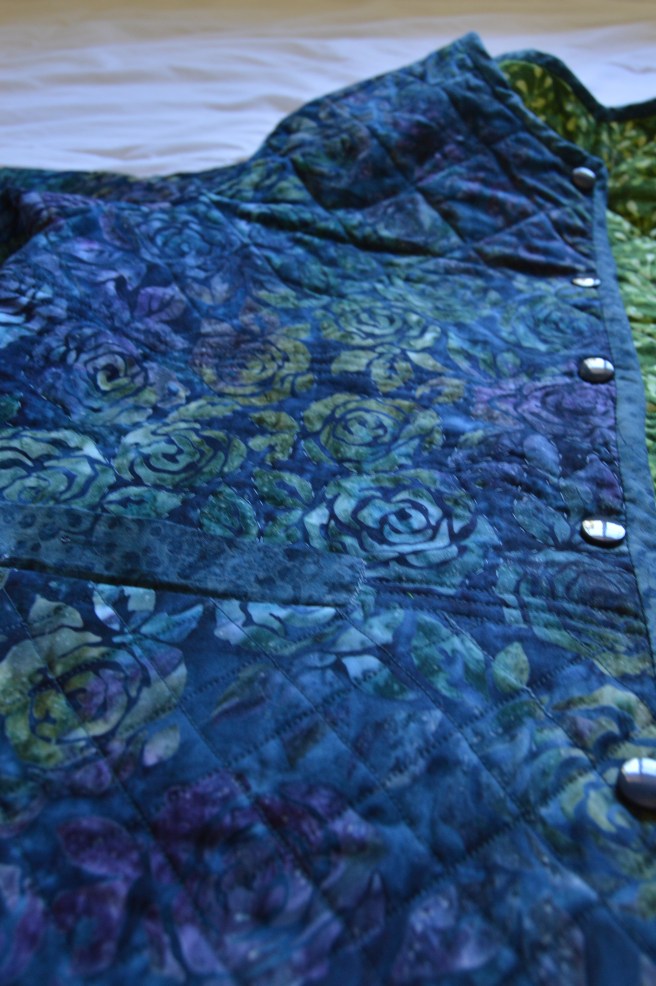
Sorry, this picture is a bit blurry, but you can see the hand quilting around the roses there in the middle. Making this jacket the second time around was so much easier and a lot less terrifying. I definitely had to read the instructions for the welt pocket the second time around, but I was a lot more comfortable with all the steps and didn’t feel like I was making a giant mistake the entire time.
I put off adding the snaps to my jacket until my mom’s jacket was finished too so that I could just add them all in one sitting. And, let’s be honest, I was putting that step off because I was completely terrified! After reading several tutorials and practicing on some scraps, I went ahead. I used my sharpest pair of scissors to make the holes and, while it worked without any glaring errors, it did give me heart attack every time it slipped more than I had intended. An awl is definitely going on my To-Buy list! I was extremely careful, but can you imagine if I had torn a hole in my jacket after spending all that time? Yikes! Not worth it! (This is a great example of “Do as I say, not as I do.”)

So, so, so. The tamarack jacket! Overall I absolutely loved this project! If you plan on making one for yourself (or for someone else!) just know that it is a labor of love. It will take some serious time. I’ve read of people who were able to get one of these whipped out after two full days of working on it-which is amazing to me. For me, it took about a week or two working during most nap times and after the girls had gone to bed. Either way, you’ll dedicate some serious time to this project. But it’s well worth the effort, especially because it’s a pattern that teaches great skills (or encourages to improve skills you already have).
My only complaint would be just how big the pattern turned out. But, again, this can easily be fixed by measuring thoroughly and choosing the size you sew up based on what the finished garment measurements are.
I also need to do a little more brainstorming as far as styling goes. I love the look of the jacket, but I do struggle to know exactly how to wear it. This might have more to do with the color I chose than anything, but in any case, I’ll have to keep my eye out for more inspiration.
Anyhoozle. Congratulations to anyone who made it this far-this post was huge. But as you can tell, I absolutely loved this project! The pattern was excellent. Making the tamarack jacket was fun, challenging and it stretched my skills. It was a great slow-sewing experience.

What a lovely gift for your Mom! I’ll bet she was thrilled. Both jackets are beautiful!
LikeLike
Thanks so much Lezlie!
LikeLike
What size snaps did you use, great post
LikeLike
Thanks, Sharon! I used #5 heavy duty snaps which are 5/8 inch
LikeLike
loved your post! I’m researching for a quilted jacket and I think the pattern you used is just the one. I’m taller than average I plan on adding 2-3 inches. Do you think I can without distorting the lines.
LikeLiked by 1 person
Absolutely! Adding length shouldn’t be a problem! The pattern has been updated since I made it, but my pattern doesn’t have a lengthen/shorten line. If I were lengthening, I would probably add the length in around the waist of the pattern. Just be sure to add length to your front AND back pattern pieces. And don’t forget to check sleeve length too in case that also needs added length. Good luck and happy sewing!
LikeLike
wow, thanks for all the info and tips. I really want to make this jacket for sure and your info has pushed me closer to doing it! So are you saying that the fit of the jacket is big and that you should go down a size, or, pay attention to the exact measurements and would you go up or down in pattern size if you are in between sizes? Also, love how you quilted the jackets. I am trying to figure out how you quilted the fabric so you could match the pattern to meet up on the sides and front and sleeves. I have a longarm and would love some tips on how to quilt the fabric so I can lay it all out correctly to match. Any tips would be gratefully appreciated!
LikeLike
Thanks so much Joanne! I hope you do make your own, it’s a fun project! If you are between sizes, I would probably recommend using the lower size, but the Tamarack Jacket instructions include finished garment measurements so definitely take those into account as you select your size. To make quilting match up, I like to start at the point on the pattern where the side seam and armscye meet because it will all line up-front and back bodice and sleeve-during construction. Measure and mark! If you’re doing it on your long arm, I bet you could even baste them all in a line to make it easier? Hopefully this makes sense! Good luck!
LikeLike
Thanks for the quick response and info. I a guessing you did the quilting portion on the fabric first and then picked the matching points like you advised.
I better get busy and get several of my quilt projects finished and the. Do the jacket!
Joanne
Life is too short to drink bad wine!
Sent from my iPhone
LikeLiked by 1 person