


This post has been a long time coming.
And it will probably be a long one.
And please remember that I am not a professional…in anything. Okay, deal.
I’ve wanted to make a wrap dress for a reeealllly long time. Have you guys seen those cute floral wrap dresses that every woman seems to have? Well, I want to join the masses in owning one but they are pretty expensive and I figured making one would be cheaper and it’d be FUN! The problem is that I have a phobia of buying fabric online (I want to FEEL it!) and I haven’t seen what I want at the local fabric store yet. Bleh.
When Christmas got close, I started thinking about doing matching Christmas outfits for the fam (in the style of our Easter outfits) and I decided to finally do the wrap dress, although not in floral.
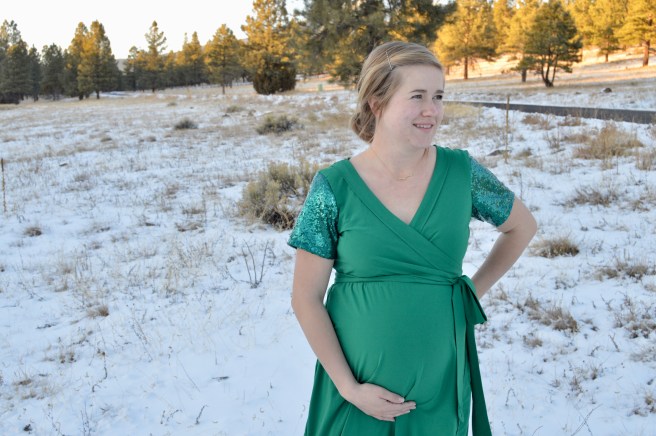
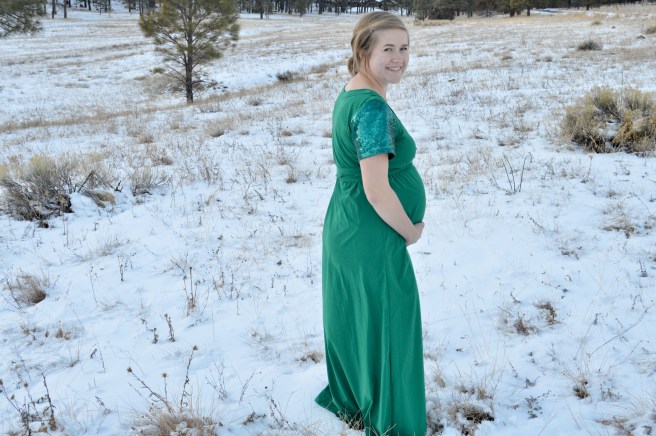
The dress definitely ended up being more special occasion than I had been planning…but, even so, I was seriously so excited with how it turned out. Lots of the time, when I make something for myself, I wear it once-out of obligation-and then never again. This dress is one I could see myself wearing again and again. I’m holding onto the pattern I made in hopes that someday I DO find the perfect floral knit so that I can make the same dress, but a little more casual.

Speaking of patterns…I think that the success of this dress was due to lots of research, careful measuring and making my own pattern! There are lots of sources online explaining how to SEW a wrap dress…but none that shared how to create a pattern for a wrap dress. So I ended up making my own pattern. I realize that a more practical person would’ve just bought a pattern…but clearly that’s not me. Here, I’m going to share how I made the pattern for my dress, so that if you get bit by the exciting (albeit slightly reckless) sewing bug, you can make your own wrap dress too!

For the pattern drafting, you will need:
- Ruler
- Sewing Tape Measure (to take your own measurements-not pictured)
- Pencil
- Paper (You can really use anything, although if it’s smaller, like printer paper, you’ll have to tape pieces together. I use a long roll of freezer paper, but just use what you have on hand: newspaper, parchment paper, paper bags, etc.)
- Craft scissors (not your fabric scissors)
- A shirt that fits similarly to how you want the bodice of your dress to fit (no worries-the shirt will remain completely in tact).
I’ve found it’s easiest to take all my measurements, write them down and then start on the drafting. To measure, put on the shirt that you’ll be using to make your pattern. (If your shirt is different than how you want your dress to be, make note of it while it’s on you and measure how you want your dress to be. For example, if your shirt has short sleeves, but you want long sleeves, measure for the long sleeves). Here are the measurements you’ll want to take:
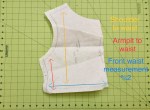
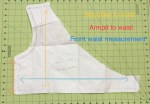
- Shoulder to waist (the waist is wherever you want your sash to hit. Since I’m pregnant and don’t really have a waist, I measured to right below my boobs. If I wasn’t pregnant, I’d definitely go more toward my natural waist)
- Front waist measurement
- Back waist measurement (you could also just measure your waist and divide it by two. I chose to use two separate measurements because I measured from seam to seam on both the front and back of my shirt and the front measurement was slightly bigger…but that might just be a pregnancy thing)
- Neckline to sleeve seam
- Sleeve length
- Armpit (not really your armpit-but where the bottom of your sleeve is) to your waist
Now that we have our supplies and measurements, we can get to drafting. For the wrap dress, we’ll end up needing 3 different pattern pieces: Bodice back, bodice front and sleeves. This is what I did: (also, this video was a helpful guide to how to use clothes to make patterns)

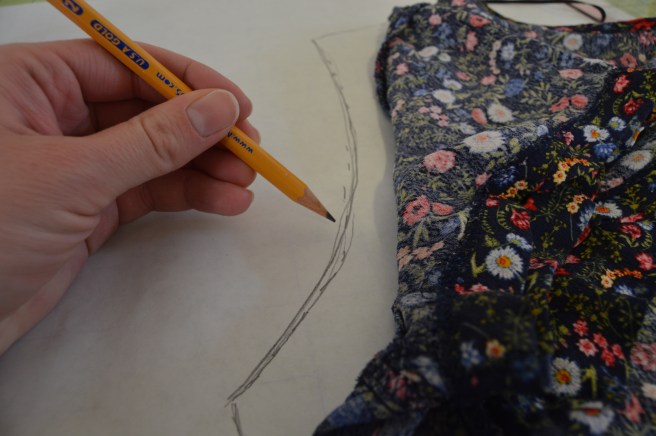
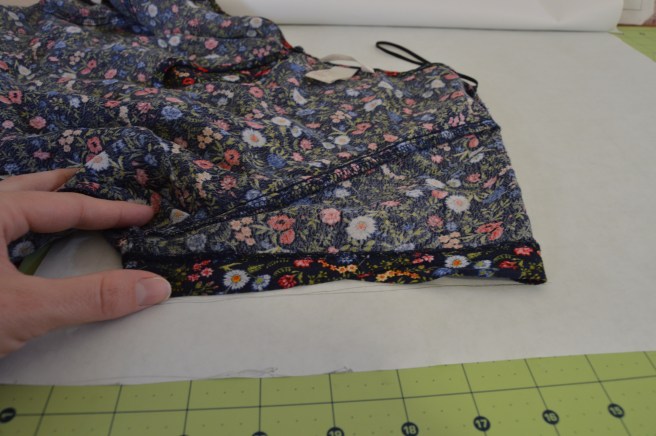
I made the bodice back first. Since the back is the same on one side as the other side, we only have to draw half of it. Turn your shirt inside out, fold it in half exposing the back, and lay it on your paper so that you have extra space on all sides.

Trace the shirt along the back, the neckline and the shoulder.

When you come to the sleeve, you’ll have to carefully feel where the seam is…

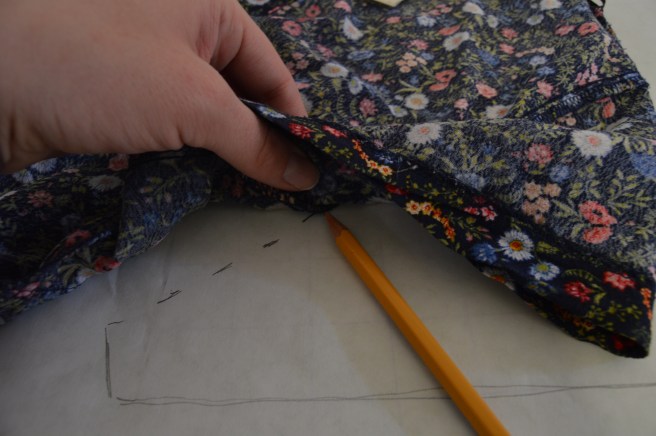
Then (again, being very careful that your shirt doesn’t slide around as you do this), lift the sleeve-still holding your finger where the seam is-and draw a mark where your pencil is. You’ll do this the entire length of the sleeve-feeling the seam and flipping to mark.

Until you have dots along the entire sleeve. No worries if it’s a little crooked (like mine).
Just use your pencil to connect the dots and kind of straighten things out.

You can set your shirt aside at this point. Use your ruler to measure from the bottom of the sleeve to your waist and draw a line (which is your side seam). Also measure from your shoulder to your waist and draw another line (which is your waist).
The pattern is looking pretty good at this point! Now we need to add a seam allowance.

Standard U.S. seam allowance for clothing is 5/8 of an inch. But lots of people use 1/2 inch because it’s close enough but easier to measure. Choose whichever you want (don’t go any shorter, though).
Be mindful that not every line needs a seam allowance. Depending on how you are finishing your neckline (and I am not a pro at necklines so I offer no insight on this matter), you might not want a seam allowance there.
I made a mistake on the picture below…see if you can catch it…

Yep, I drew a seam allowance line where my fabric is supposed to be folded…which is a place that obviously doesn’t need a seam allowance. But everyone can rest a little easier knowing that my error wasn’t on the original pattern (just the one I did to take pictures).
Drawing your seam allowance on the straight lines is super easy. Around the curves, just measure and make a tick mark every half inch or so and then connect the dots.
An important thing to remember to do when making your own pattern is to LABEL! I always write what the pattern is for (i.e. wrap dress), what pattern piece it is (i.e. bodice back) and any other relevant information (i.e. cut on fold, what my seam allowance is, etc.).
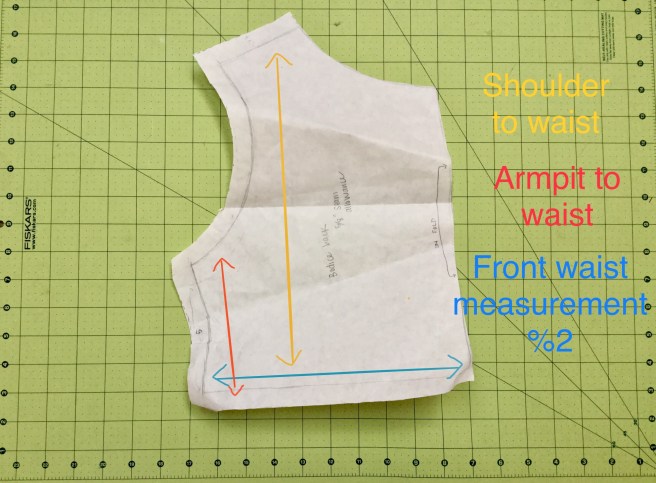
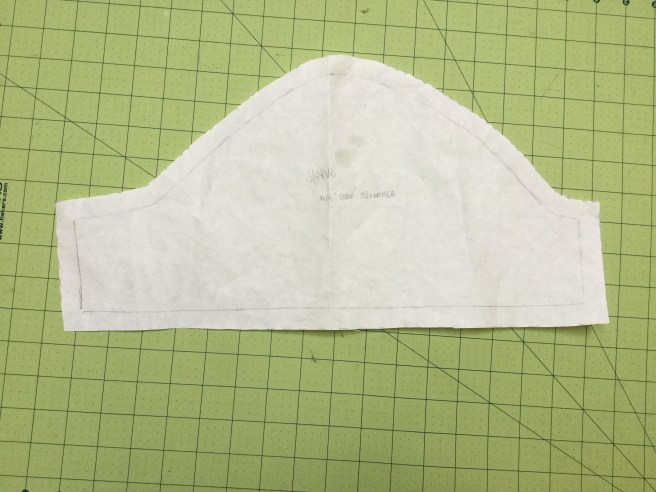
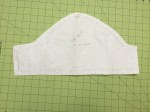
Here’s my bodice back finished, with correct seam allowances. It’s cut out along the seam allowance line and ready to be used to cut fabric. (I didn’t note it on the picture, but that straight line at the very top is the measurement of your neckline to where your sleeve starts.)
The bodice front is created in a similar way (I didn’t take pictures of the step by step, but it’s the same concept).
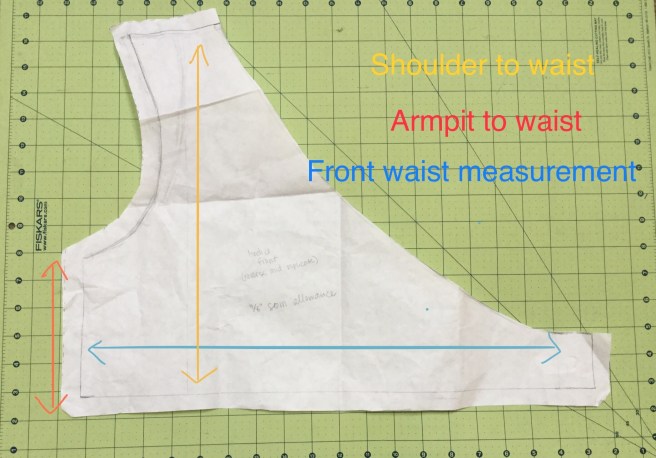
Here’s my finished bodice front. Note that since the neckline is so different, I really only used my shirt to draft the shoulder seam and the sleeve. Don’t forget to add seam allowances and to label!
For some reason, sleeves have always seemed so foreign and scary to me! But using a shirt to make your pattern, can really help side step that fear and help you feel confident that your sleeves will turn out great!

To make your sleeve pattern, lay your shirt down on the pattern paper with your sleeve folded in half. This piece will NOT be cut on a fold, so make sure you have room to flip the sleeve and continue tracing.
Mark the bottom of your sleeve, as well as that portion you can see between my thumb and index finger.
Then use that same method we used on the bodice-feel where the sleeve’s seam is, carefully lift and mark.

When you get to the top of the sleeve, carefully flip your shirt to continue the curve (make sure the fold stays in the same place).
Oh, wow, that’s an ugly picture. Ha! But that is roughly how your finished sleeve pattern should look. Note that there’s a seam allowance all the way around. Also, remember that the bottom of the sleeve will be hemmed. Anywhere that is going to be hemmed, I always leave an extra couple of inches so I can play with the length AND so that I can do a rolled hem if I want. The point is: give hemlines some extra length just to be safe, and to give you some options (you won’t regret it!).
Okay, so you should have three pattern pieces at this point:
You could definitely make patterns for your skirt pieces and your sashes…but I chose not to because they just consist of straight lines. Here’s a general idea of what you want your skirt pieces to look like:

Sorry, again, for not the best picture. But. The middle skirt is what you want your back skirt to look like. And the ones one the side are how you want your side pieces to look (the angled edges being the side seams). I wish I had the angle degree or a formula for how much of an angle you want, but I don’t (and I’m really sorry!). I just kind of winged it! Do angle it, though, and make sure that the bottom of your skirt piece is wider than the waist (mine was 8 inches longer on the side pieces and 15 inches longer in the back, if that helps!). Don’t forget to include seam allowances and add a couple extra inches at the bottom for hemming!
I wanted my sashes to be long (long enough to wrap around me an extra time) and to be thick so I cut my 2 sashes at 5 inches by 60 inches (yes, 5 feet!). This can vary, though, if you want a different look.
This post is already huge so I’m going to post the (very general) sewing instructions later this week! I’ll talk about the kind of fabric I used, how much I used, and stuff like that. Let me know if anything needs clarification!
{P.S. Happy Birthday, Neil Diamond!!! I guess it’s appropriate I’m posting a project with sequins😂}

Kim! So awesome!! Your mom told me that you were starting to design your own pattern. I’m so impressed. It turned out so great!
LikeLike
Kim! So awesome!! Your mom told me that you were starting to design your own patterns. I’m so impressed. It turned out so great!
LikeLike